I’m not against AI as a better Google. For example, I needed to know recently whether crickets still croak at night in late autumn and what wild mustard would smell like if you sat on it. These are the kind of weird questions writers come up with and – if you’re me – completely block the ability to progress with the work until they’re answered.
Here are some others (and trust me, all totally legitimately asked in the context of feverishly trying to complete a science fantasy novel):
What are gorilla boobs called?
Where exactly do blind people place their fingers on someone’s face to read their expression?
What is the difference between a glyph and a sigil?
What causes the black streaks beneath a crying woman’s eyes: eyeliner or mascara?
Say a man’s arm is severed and cauterized by a sentient cablesword – would it steam, bleed, smoke, or all three?
Forgive me. I like odd details when I’m reading books so I want them in my own concoctions. And I want them to be right. Something like Gemini or ChatGPT can handle these iterative conversations to answer questions like these better than a Google search. Far better and much faster.
Okay, what about the writing, though? The creation of the work itself?
I’m also not against AI handling the monotonous and thankless task of resolving thorny punctuation issues. My kryptonite punctuation errors so far have been:
I join two complete thoughts with commas rather than semicolons. I never liked semicolons. They look weird but whatever.
I forget to add commas when I use introductory phrases (“Beneath the plaque Mazewater noticed old carvings.” – missing comma after ‘plaque’
…
You know what – let’s leave that topic. I did a search for punctuation goofs I had to fix and it’s embarrassing. You get my point on an editor that can quickly resolve where a comma goes and whether to bust up a sentence is awesome.
But the writing?
Well, somewhat more controversially, I’m very much in favor of quick and dirty concept art by AI to help me visualize a character or backdrop I’m dreaming up in the way that George Lucas used Ralph McQuarrie and so many others in his own worldbuilding.
Meet Uncle Ong, for example, based on my descriptions (if you read Mazewater one day, this guy will break your heart – I promise):
So what are you saying?
Many of people are avoiding AI because they rightly have concerns about intellectual property and diminishing quality of work that is increasingly produced by software. Legit concerns, yes, but neither is insurmountable. I also feel that, as a creator, failing to have cutting edge AI tools in your kit is like trying to hold back the ocean with a kitchen knife.
Maybe it makes you a person of principle. But it puts you behind your competitors for sure.
I’m Brian Bennudriti, creator of the Salt Mystic universe, and I’m several years in to writing the next novel in that setting. It’s to be titled MAZEWATER. In February, I told you here about my plan to speed up how long it takes me to finish a novel. My record, unfortunately, is 7 years. I’m getting old, man. My kids are practically grown. How likely at this pace is it I finish even a handful of novels like I planned? The ideas inside my head are exploding into life but I can’t capture it in the words quickly enough. Still, it’s the same fire now that lit up my mind as a child…the love of creating an imagined world.
What I told you in that February article remains true and I believe I’m moving with more focus and less backtracking. But I saw a headline the other day that led me down an unpleasant and depressing rabbit hole.
“Nobody plays video games anymore.” That’s what it said. The reason it hit me hard was I’ve long speculated that future storytelling frontiers would be in gaming: tabletop and in large-scale video games. Much like Walt Disney and those early anime illustrators made a true art of cartoons long perceived as childishness before them, like Frank Miller and Neil Gaiman made true literature of comics, again long perceived as childishness, I’ve been convinced that games like Tainted Grail and Elder Scrolls were the future of storytelling.
Yet the article cited research by Matthew Ball, which you can learn more about here. To boil it down for you, there are too many things competing for our attention. We struggle to care about anything new, so gamers play Fortnite, Call of Duty, Grand Theft Auto, Roblox, and Minecraft because it’s easier to just stay where you are. Switching costs are high to learn a new world, even if they are amazing. Everything else is high-dose dopamine in Tik Tok bursts of frenetic nonsense.
You write science fiction & fantasy! What do you care about video games?
The National Endowment for the Arts found that the share of US adults who had read any novel or short story during the preceding year declined from 45.2% in 2012 to 37.6% in 2022. The share reading any book fell from 54.6% to 48.5% over the same period. A separate analysis of the American Time Use Survey found that the proportion of Americans reading for pleasure on a given day fell by approximately 40% between 2003 and 2023—from roughly 28% to 16%.
Yeah, it’s not just video games, man. We’re all hooked on dopamine from our phones, killing our attention spans, and the economics and psychology of dealing with the learning curve and investing in new worlds is stacked very much against something new coming into the literary universe. If I make the most perfect setting and the most interesting characters with dialogue and action that pops, who will read it?
You’re depressing me.
Hold that thought. That same American Time Use Survey said those who still read spent considerable time doing so: approximately 97 minutes on days when they read in 2023. Publishers Weekly reported that US print sales rose slightly in 2025 and remained above pre-pandemic levels, while romance and romantasy experienced strong growth. Audiobook revenue rose 9% in 2025 to $2.43 billion, and fiction accounted for approximately 71% of audiobook sales.
The folks who ARE reading are still voracious about it. If you’ve ever been to a comic or pop culture convention, you’ll meet the most incredible people in the world. And they’re all dreamers who want to enter worlds like this. What I’m saying is they’re still out there, and they’re still consuming massive amounts of content. What is weakening is the audience’s willingness to enter a long work before it has proven its value. People still devote hundreds of hours to stories they love. They are less willing to devote six mediocre hours to finding out whether they might eventually love something.
So what does that mean for storytelling?
I believe I’ve mentioned Yu-Kai Chou and his mind-bending framework for leveraging gaming psychology for human motivation and change management which he calls Octalysis. Read about that here. He’s the first guy I ever heard talk about the steps of game design:
Scaffolding (how players gain a sense that the game is going somewhere so they invest more heavily)
Endgame (how players receive a sense of accomplishment and reward)
I’m seeing parallels for this set of steps in the future of storytelling, honestly. I see an increasing importance on merchandise, art, and social media interaction to draw people in with the hook for the imagined world. I see that future storytellers may have to be more visual thinkers and incorporate strong, intriguing visuals that can be sticky in the minds of people who chance across them. Maybe more than that though, I’m struck by the increasing importance of the opening. That first five pages. If you don’t hook someone there, then you won’t hook them at all. Too much is waiting to steal their attention away, and much of that is optimized through algorithms with their big, pointy teeth to be better at stealing attention than the writer is.
*
Just a few thoughts as I round the corner at about 80,000 words in the work in progress. I thought I’d be ending the book around this word count but I will very likely push it to ~100,000 words. It feels more correct at that length. I promise I’ve trimmed and cut all the fat! I’m not rambling. It’s a tight and intriguing ride in my opinion. Just needs to simmer a bit for these wonderful paper people to feel real and for the world to shake like it needs to.
Anyway, I hope this has been food for thought. I’ll share more about Mazewater over the coming months as things finish up. If you have any questions about it, feel free to let me know.
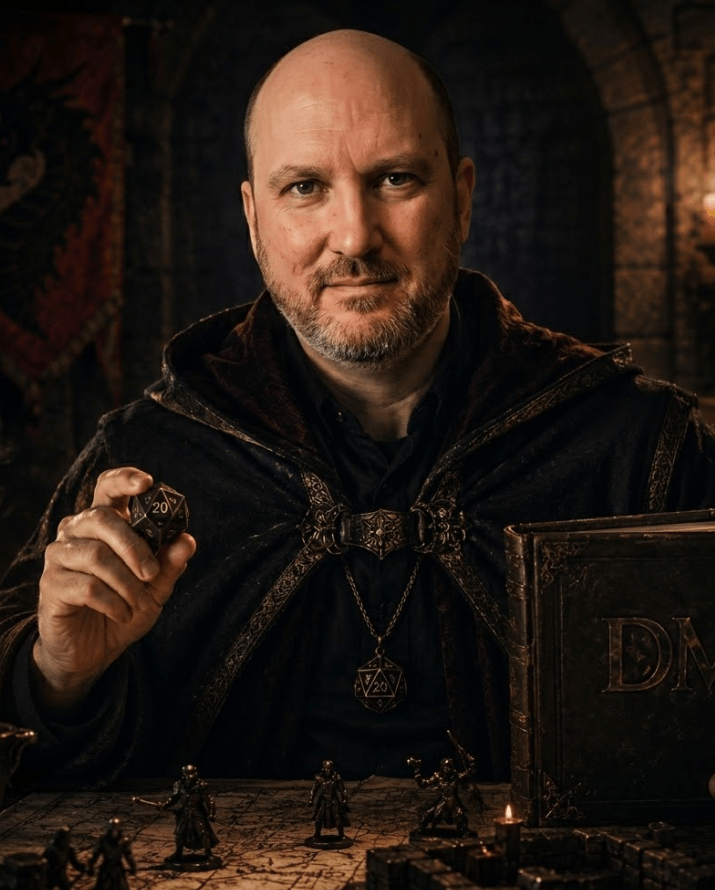
Michael Weems is a lifelong Dungeon Master and entrepreneur, longtime Chief Digital Officer of Heritage Auctions, and creator of ZapGM: an AI-powered tool looking to explode how tabletop worlds are built and experienced. We’re going to dig in with him today and talk about tabletop roleplaying, the potential and the risks of AI tools, and what it takes to build a mind-bending evening in a game.
Welcome back to our ongoing series of interviews with innovative creators in science fiction & fantasy storytelling, art, and gameplay! We call it the Inspiration Creator Series.
Michael, thanks very much for spending some time with us! Dungeon Masters are one of the great unappreciated treasures of the world. If no one ever said so, let me just thank you for the long nights googling folklore, drawing maps, printing off cool handouts, and practicing your weird voices. That’s awesome, and we all appreciate it.
That’s a great intro. Glad to be here.
Q. Let’s get your nerd credentials out of the way so we have everyone’s attention. How far do you go back with D&D or other RPG’s and which ruleset do you prefer?
I’ll explain by way of a trek down memory lane for us, um, more seasoned gamers. I was first introduced to OD&D by my friend’s older brother, I think around 1980-82. That would make me maybe 13 at the time. That friend started running for us soon after, and he got the Basic set with the dice you had to color in yourself with the provided wax pencil. I became a Dungeon Master in high school around ‘83, and a Game Master in college in ‘92 when I got hooked on Gurps and Champions for their one system, infinite worlds approach. Champions turned into Hero Games and I ran that and 3.5/Pathfinder mostly for a few decades. However, some of my favorite experiences have been with the Conan official D20 RPG, Warhammer Wrath and Glory and Eclipse Phase game systems. Those provide nuance that is hard to replicate from an “everything” system, and I highly recommend.
Q. What were your biggest creative inspirations growing up?
This may be cliché since everyone around this time was heavily influenced by them, but my influences came from shows like Star Blazers, Battle of the Planets (Gotchaman), Conan, & Star Wars. Literarily, books like the Stainless Steel Rat by Harry Harrison (I have a very dry sense of humor) and later by Snow Crash by Neal Stephenson and The Neutronium Alchemist by Petter F. Hamilton (I love hard sci-fi). It’s almost embarrassing how normal that is.
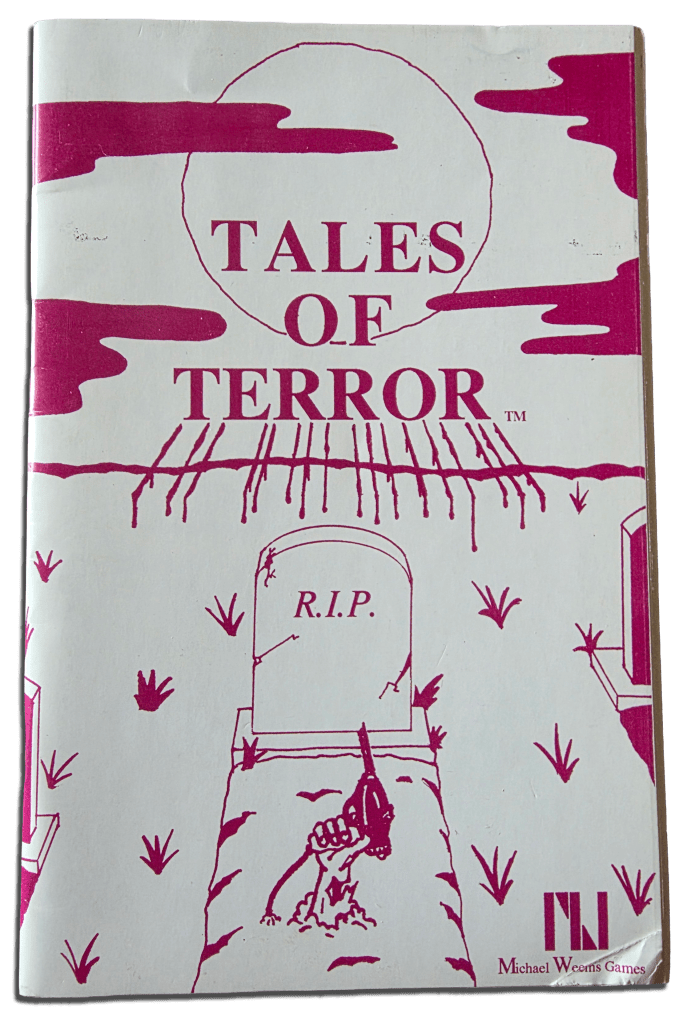
Q. In the prep for this chat, I saw that you mentioned having created several RPG’s, even selling 50 copies back at a convention in 1990. Let’s pause on that – pitch that game to me now. What made it different?
I’ll get the boring one out of the way first. I made a game adaptation of the movie “TAG: The Assassination Game”, from 1982. In this game, called Slayer, the players really hunted each other to the death for sport and profit, while the cynical public spurned them on through prizes and ad revenue. With that out of the way, here’s the sale pitch:
You’re a high school junior, your girlfriend Julia just broke up with you, and you are drowning your tears with your buddies down behind the bleachers late one Friday night. As the third beer is just starting to hit, your friend starts telling ghost stories about the local hermit that’s been hanging around campus lately. It’s absurd gossip, and it gets more fanciful as he spins the tale, but you’re loving it. Suddenly, you hear your name screamed from the woods. Not called, but screamed. It’s Julia, you’re positive, and you don’t know what to make of this. A cruel prank. Real trouble? Doesn’t matter, you have the disadvantage “must investigate strange occurrences alone”, so you tell your friends to wait there while you see what’s what.
The game is called Tales of Terror. It is a very simple game meant for the rules to take a back seat to the role playing. You play a character in a horror movie, which could be a victim aspiring to be a hero, a monster or a villain. You build your character with advantages and disadvantages that that were all about flavor. For example, a victim might have an advantage of “scream that can be heard a mile away through solid rock” (Julia), but a disadvantage like “must split from group when in danger” (Julia again) or “car won’t start when in danger” (let’s hope that’s not you, because you feel that urgency to investigate). A villain might have “surprise appearance”, but also “must lecture victims for X rounds”, etc.. The game works great with both seasoned role players, and total novices equally well. Thanks for asking, as now I have a strong desire to break it out again.
This was 1991, and I was inspired by “It Came From the Late, Late, Late Show”, which is similarly themed but very different gameplay.
Q. My personal most memorable RPG moment was back in the 90’s playing Call of Cthulhu with my buddy, his semi-girlfriend (which I thought might have been better off as my girlfriend) and some folks I didn’t know. There was this book that drove you crazy if you read it, and my character tore off a page to carry it around and weaponize it. Anytime somebody gave me crap about something, I just showed them the page. Anyway, as I was descending into a basement researching weird noises, my buddy killed me with some floating whirling blades. She begged him to resurrect me. Yes, he won and I was dead. But she was impressed, and that’s what mattered more at the moment.
How about you? What’s your most memorable tabletop moment?
Not joking, I just laughed out loud. I didn’t think I would have to compete with the interviewer, but here goes. I love stories, as they are why we play, but I will limit myself to two and I hope you have room for both.
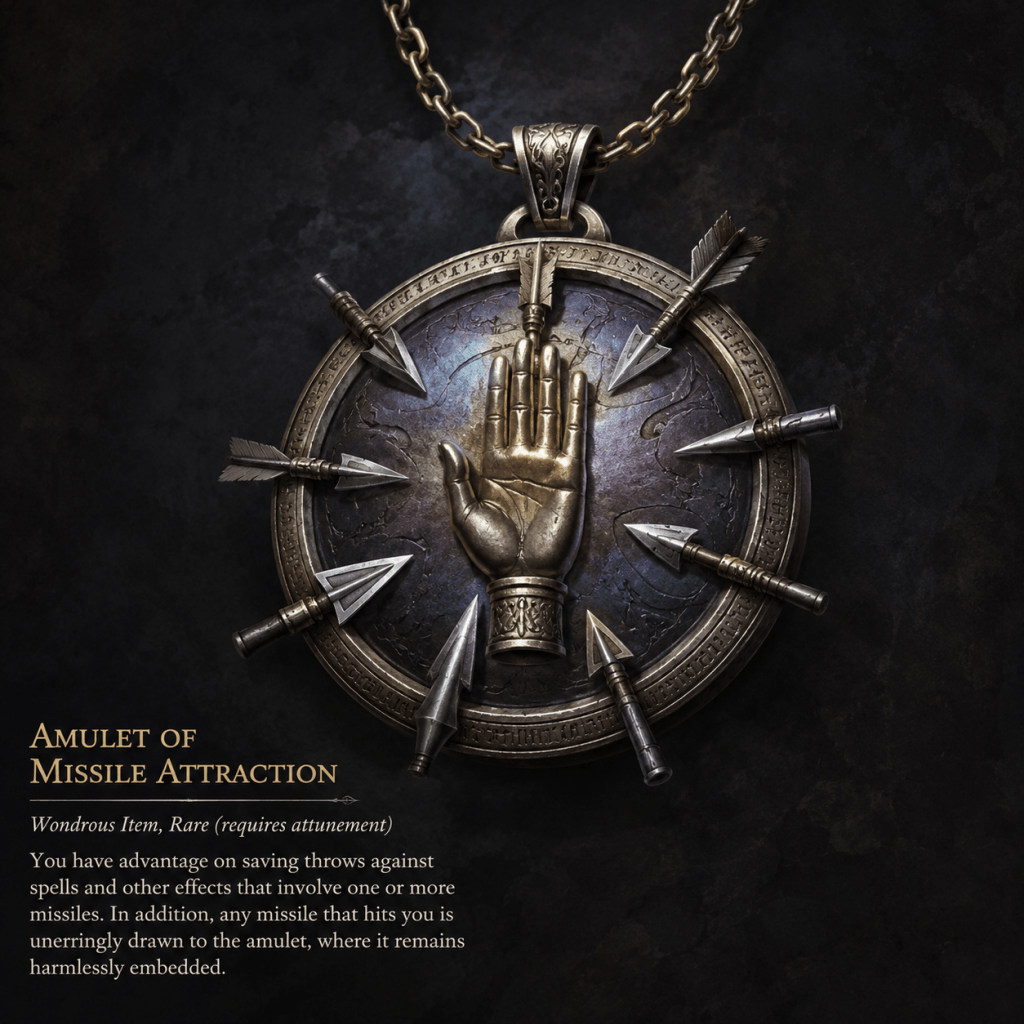
In the first, I was running D&D in college with people that are mostly still in my group today. One of them got an amulet of missile attraction in loot and thought it was missile deflection. The next fight was against a bunch of bugbears, many with bows. This player was a pin cushion by the end of the fight, and I was ready for him to lay it on me. But when the dust settled, I swear he said out loud to the rest of the group, not even remotely ironically, “just think how many times I would have been hit without this amulet!” I had no choice but to tell him the truth; it was too cruel at that point to continue. In his defense, to this day, he swears that I had previously stated that I never give out cursed items. I may have lied.
The second story is much more recent, same group. I was running Warhammer and the players were led by a rogue trader and solving a massive mystery involving all the gods of Chaos, with a universe shattering artifact. Throughout the story, the party would encounter subplots relating to one god or another, and discover how these disparate encounters were starting to weave into something larger. The one god that they had not had even an inkling of was Tzeentch, the god of plots and manipulation, among other things. Even though we have some real Warhammer fans in our group, they didn’t take notice of this, so they weren’t as suspicious as they should have been.
My master plot involved getting a Tzeentch spy onto their ship, and this spy was a servitor that they encountered named Solon. He still had some of his faculties and so could communicate better with the party, and they found him at an abandoned ancient research site for the Mechanicus Adeptus. I really hadn’t figured out how I was going to get him to weasel his way onto their ship, and so was going to have to just role-play it based on how they reacted to him. It turns out that their reaction should not have surprised me, because “party see likeable NPC, party adopt NPC”, which is what they promptly did. I was floored, but I knew that when the reveal happened many months later, nobody would believe that I had planned for him to be the spy all along. So I called another close friend, explained to him what happened, and let him know that I would one day call upon him to reveal my secret.
6 months passed, dozens of games where the party was harassed, outmaneuvered, and backstabbed to the point that they started questioning everyone and everything… but inexplicably, not Solon. And then on the final night when the time was right, I stopped and made a phone call without preamble. As the phone rang, I put it on speakerphone and the party started asking what I was doing interrupting the game like that. I just raised a finger and waited. The other friend answered the phone and I said, “I’m here with the group, and it’s time for you to tell them your secret”. When he explained that Solon was a Tzeentch spy and that Tzeentch had orchestrated the entire campaign, the groans and guffaws were like precious food for my soul, and we all laughed until we cried.
I should note here that I don’t think I could have orchestrated such a complex plot over such a long time and with such detail without ChatGPT. I was not a big Warhammer fan prior to running, and so ChatGPT would not only council me on the rules, but also the lore as I went. Together, we brainstormed and created the whole thing with way more detail and accuracy than I could have mustered alone.
Q. What is it about roleplaying games that inspires you? Yes, escapism is nice, but is there something more to it?
I play games for the fellowship and the memories that enrich my life. I lost a friend to a heart attack (sorry for the downer), and what I have left of him are those memories. Maybe they aren’t better memories than playing golf or going clubbing or whatever other people do together, but they feel more intimate to me. Role playing is the kind of shared experience that non-gamers are missing IMO.
Q. Why be the Dungeon Master, though? What made you gravitate to that role rather than just showing up to eat somebody else’s Dorito’s?
I run games for the creative outlet. I try to create universes, plots and NPCs, which lead to interactions that are immersive and fun. I like for the games to be mentally engaging. When I craft a story arc, I never figure out how the players will overcome it. I have realistic events and adversaries with their details and motivations, and the fun for me is seeing how the players solve the problems. Besides apparently lying about cursed items, I have built a level of trust with my players that I run realistic worlds with realistic NPCs, such that they can be creative in their problem solving.
A recent game in Eclipse Phase is a great example. The goal was to save a commune of people who refused digitization from being forcibly uploaded and made into indentured servants for a corporation that held a legal debt claim against them. To the system, it was debt repayment; to them, it was death. The players only had to delay the hired mercenaries long enough for the legal wrangling to work its way through the system.
Since there is no real death in this game when you have a backup of your ego, I thought the players might simply fight the mercenaries. Instead, they uncovered rumors that the commune’s youth were contemplating suicide to avoid being digitized (a throwaway comment I made during role playing off the cuff). The players latched onto that, decided to spread the rumor further, then fake the commune’s suicide pact by collapsing the tunnels they lived in on the moon. In reality, they hid the commune in a secure bunker and let the clock run out while their legal maneuvering took effect.
I adore that sort of outcome.
Q. Tell me about how prepping for games has changed over the years. I imagine the 90’s, the 2000’s, the 2010’s, and now. So we can see the contrast, what was all that like in those different periods?
In the 1990s, prepping for a game meant a pad of notebook paper, a pad of graph paper and a no. 2 pencil. I might occasionally have a printed module, some artwork or other collateral from a Dragon Magazine, or perhaps something I made with Mac Paint on my Plus, but the ideation was all me, and the props were severely limited by my art skills (see the Tales of Terror cover above as proof).
Later, Google helped with the collateral, although I was still limited to my own experience and creativity. I don’t know of many game masters that have a confidant that they can bounce ideas off of, nor artists volunteering their custom art. It’s usually us alone, doing our best. That said, Google Image Search at least gave me a way to visually show what was going on in the game.
More recently, we got AI for both brainstorming and artwork. As it’s gotten better, it’s become an expert on my games and my worlds and is a springboard to take my games to new heights. Not only has my game prep been cut dramatically, but at the same time the game materials have gone way up in quality.
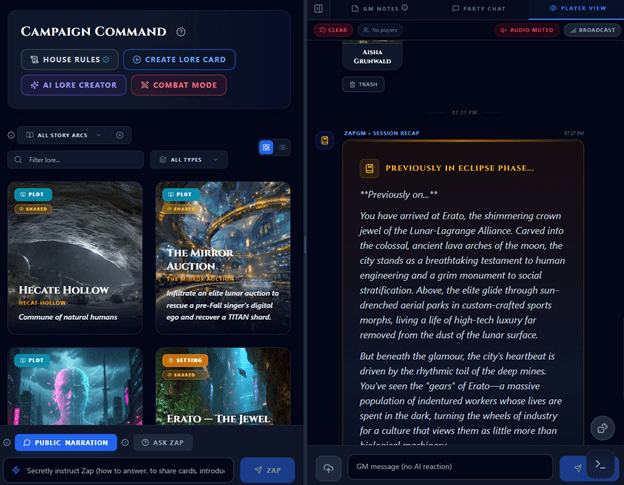
Now, I use my own tool, ZapGM.
Q. And what will it look like in the 2050’s?
About 20 years ago, I saw Ray Kurzweil speak about the singularity and the future of society. Mind blowing stuff that is coming to fruition in the next 5ish years IMO. And more recently, Elon gave an interview where he said that once we hit ASI (Artificial Super Intelligence), that all bets are off, and I tend to take that approach. So 2050’s, tough to say.
But in the shorter term, I think we’ll get AI and robotics to the point where nobody has to work. And I think that, possibly after some turmoil during the transition, we’ll end up with universal high income, where it feels more like retirement than unemployment. As someone who would like to retire in the not-too-distant future, I like to think of it that way. When people tell me they’re retiring, not once have I thought to offer condolences. Instead, I congratulate them on being able to unshackle themselves from the work week just to survive, and on finally being able to thrive by doing whatever they find valuable.
Q. You’re building something exciting right now. Tell us about that.
As I optimized my processes for prepping my games, I started coding ZapGM just for myself. There are prompting techniques, as well as agent scaffolding that can be applied to get levels of consistency, accuracy and creativity that the chatbots can’t do on their own at this point. As I honed that system, my youngest son asked if I could add some features to help him run for his friends. None of them wanted to GM, and he didn’t feel confident enough in the rules, much less the creative side of making new campaigns… so I added more features. Eventually, my party encouraged me to finish out the feature set and launch it for public use, which I recently did. As a long-time entrepreneur, the experience isn’t that new to me, but the fear of failure and rejection is just as real the last time as the first. The site just left early access, so we’ll soon see.
Q. I see exports to Roll20, Foundry, supporting Pathfinder and D&D simultaneously – it seems you’re interested in integrating with what’s going on rather than replacing. Am I wrong about that?
Because I made this tool to be helpful to me, I never saw it as competition for what’s out there. In some respects, it supports whatever game masters are currently doing. One way it does this is with pre-made maps that can be exported to those other systems. I even wrote what I think are the best online guides for importing maps with vectors into Foundry and Roll20, better than their own documentation. Another is with map editing tools that have much easier to use vector creation/editing, square and hex grid support, plus AI inpainting for tweaking maps. I encourage my visitors to use those tools to improve what they’re already doing elsewhere.
Additionally, ZapGM is a different way of viewing the world building, maintenance and hosting than other systems. It aligns with the way I create and run games, so time will tell if that appeals to a broader audience. You use it in three stages. The first is to brainstorm with Zap about the world and generate rich Lore Cards (Settings, Plots, NPCs, Adversaries, etc.). The second is to broadcast to your players with a shared canvas, where uniquely the players can come back and interact not just with their PCs, but also read the shared lore, create new PCs and Summons and more. And lastly, as the game master hosts the game, the AI can help generate unique narration with text to speech where each NPCs gets their own voice. And one of the coolest features IMO is that there is an AI overseer that watches the narration and automatically suggests and makes approved edits to the Lore Cards. So if the players anger an NPC, the Overseer will suggest noting in the NPCs Lore Card that disposition and that the players get disadvantage on future rolls. And if the game master decides to roll that back or regenerate the narration, the Overseer puts the lore cards back to the way they were before that encounter.
Maybe that sounds just technical, features in a website, but that is some of the most fun I’ve had creatively lately. Figuring out what features to add and then designing them is fun, and I even invented two new features (I have two patents pending). At some points in developing this site, I got so focused that I worked 20 hour days for several weeks straight… and promptly got sick. So I can’t say that I recommend that, but it does illustrate the level of creative energy I was pouring out.
Q. I sometimes see people pushing back on AI like a little guy with a sword wading into the waves swinging left and right and shouting to get off their beach. Yet there’s a lot of passion around this topic. I think AI slop is real but avoidable. Artists should be compensated for their work, but image generation tools are almost certainly going to be a tool in the workflow of future generations just like stock images, filters, 3D nodes, and asset libraries. My take, anyway.
What’s your position on AI in creative arts and particularly, roleplaying games? How do you address some of the valid concerns?
I agree that there are real issues around AI taking jobs, and as I said above, I think society will change in many ways we can’t predict, but we can act humanely and empathetically as we progress toward that new future.
As for game masters and players, I am thrilled with how AI can empower us all. No game master is going to commission artwork for their weekly game with 3 friends, or commission a writer to brainstorm or hone their plots and narration. AI filling this gap is enriching everyone involved IMO. For decades, this has been an unsolved need, and the improvements for me and my players are tangible.
PS. I have a friend that flirts with Grok. Let’s not go there.
Q. You’ve got a great take on Non-Player Characters in games, insisting that they be believable and not “quest dispensers”. Tell me about that.
I almost got a writing degree, and out of that came my passion for storytelling. Good stories are populated by real people, with real motives, that behave in realistic ways. I want my players to be so immersed in role playing their character, that they feel like the world they are inhabiting is real. When that happens, it’s magic. One of my players ended up so drunk in the Conan campaign that they woke up married to the daughter of a local merchant, dowry included (a goat). The wife and the goat stayed with them for the rest of their adventures and were the subject of many shenanigans. I live for that.
Q. All right – let’s wind it up with a banger, then. Tell me your absolute ideal experience you imagine in a roleplaying game. Get crazy.
The year is 2038, my brain is integrated with my AI assistant and my personal humanoid robot is integrated with that. Each of my players, my lifelong friends that have been with me for 50 years or more by now, have the same setup. As we cast a portion of our consciousness into our physical avatars, they step forth both in the real world and into an alternate reality with the aid of AR/VR. Although we are each in our various comfy spaces with our real bodies, me on the shore of Interlaken Switzerland, Brent in his mountain cabin, Matt in a permanent renaissance community, Bill sailing the deep blue and Duane in a Tokyo high-rise, our avatars step into the Conan universe yet again. Something about that world keeps drawing us back.
Your readers might think that I would be only a player now. But something I think many players don’t realize is that game masters do it because they love it, not because they have to. So, I imagine that as we step into the game again, I am both orchestrating the adventure with my AI assistant and also getting to be part of the adventure to boot.
Thank you for giving me this opportunity to share my story. I hope your readers will check out www.ZapGM.com and more importantly, find it useful.
*
Thanks again for your generous time today, Michael. It was a blast, and I’m looking forward to seeing more of what you’re up to as things take off for you.
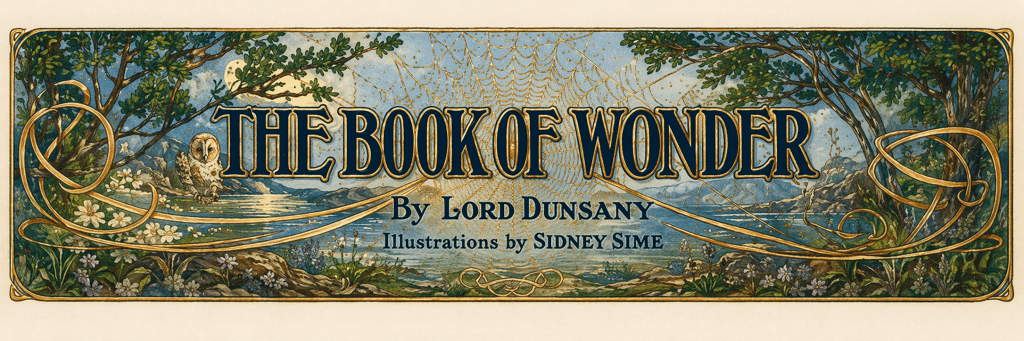
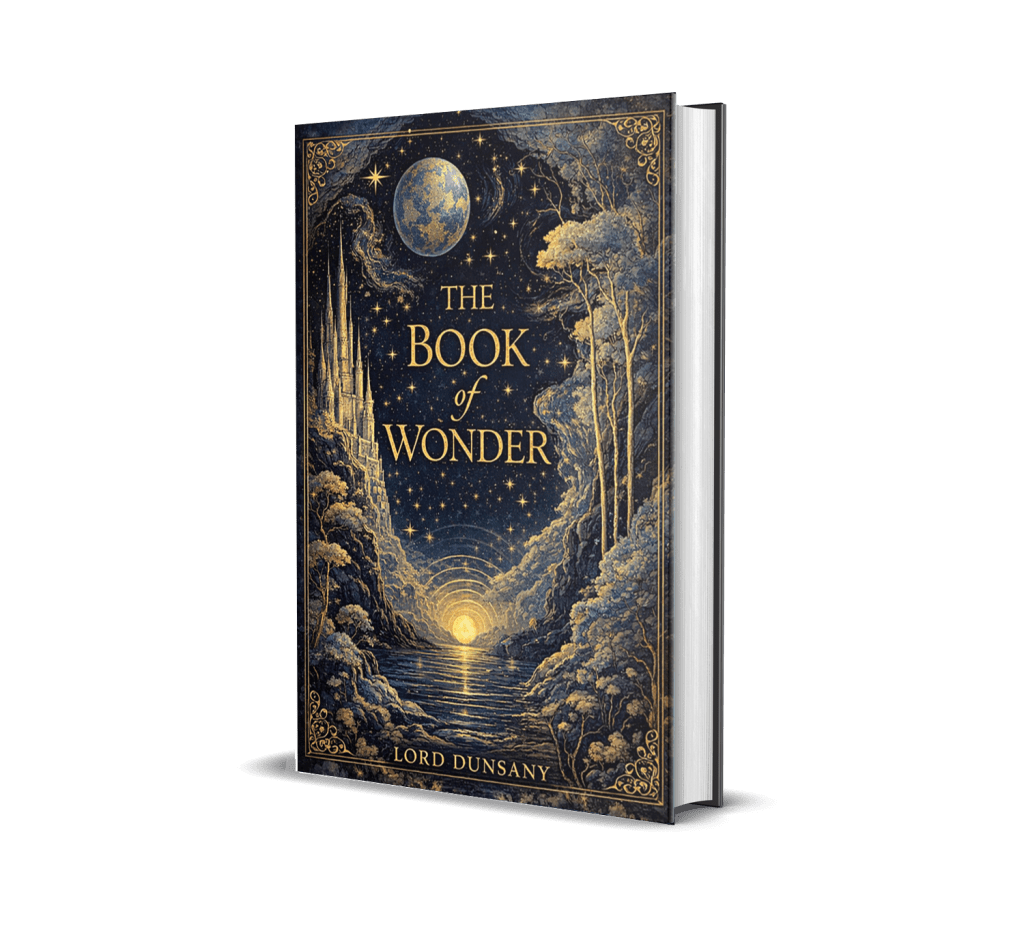
There was a writer of fantasy stories in the early 1900’s that helped lay the tracks for the books and films of imagination we enjoy today. Tolkien read him – supposedly gave a copy of the book we’re talking about today to Clyde Kilby in preparation for helping the Professor compile and develop The Silmarillion. H.P. Lovecraft wrote a poem about that same book. In fact the author, Lord Dunsany, inspired creators as far-ranging as Clark Ashton Smith, Guillermo del Toro, Neil Gaiman, Jorge Luis Borges, and Arthur Clarke.
He’s kind of a big deal.
But this particular book of 14 stories though, The Book of Wonder (available free here), was a real game-changer. Most, if not all, of the stories first appeared in a lifestyle magazine titled The Sketch from 1910 – 1911, then were compiled into the single volume for publication in 1912. Taken together, they read like a series of dream-visions, and feel comfortable and sleepy, like they’re being told in a warm voice by a crackling fireplace. It’s a collection of short fantasy tales about strange kings, cities, gods, and wanderers whose desires—for wealth, beauty, knowledge, or escape—lead them into eerie, dreamlike adventures. The tales often turn on irony or fate, showing how wonder and curiosity can just as easily bring enchantment as loss, transformation, or quiet doom
But there’s a real injustice that was done to this book, and Grailrunner is fixing it today with one of the coolest freebies we’ve ever given away. There will be a free download link at the end of this article, but first you have to know what injustice we mean and get as annoyed as we are about it!
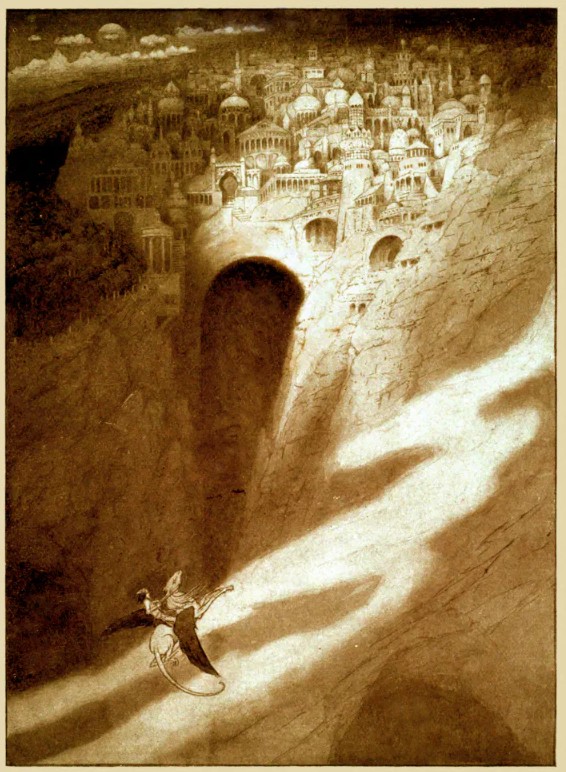
Let’s talk about Sidney Sime for a second. He did this painting, which is how I first came across him.
Isn’t that gorgeous?! Honestly, this is the kind of thing art is for! It’s called The City of Never, and it sends my mind wandering! I really love it.
Sime started his working life in a coal mine, almost dying in an accident, before working in various jobs ultimately winding up a sign painter. He managed to get some of his eerie, dreamlike art published in The Sketch Magazine as illustrations, and that’s where Dunsany first saw his work. When Dunsany contacted him to illlustrate his work, The Gods of Pegana, it began a long and incredible collaboration that lasted the rest of Sime’s life.
Then something with the feeling of destiny happened. We’ll let Dunsany tell you about that:
“I found Mr. Sime one day, in his strange house at Worplesdon, complaining that editors did not offer him very suitable subjects for illustration; so I said: ‘Why not do any pictures you like, and I will write stories explaining them, which may add a little to their mystery?’”
-Lord Dunsany
Wait a minute, what are you saying?
I’m saying that Dunsany hadn’t written The Book of Wonder or its component stories when he asked Sime to just paint something. Anything! He just suggested that an artist with a wild imagination go wild and see where it led him. Then, Dunsany would make something of it.
That sounds cool. How did Sime decide what to paint, then?
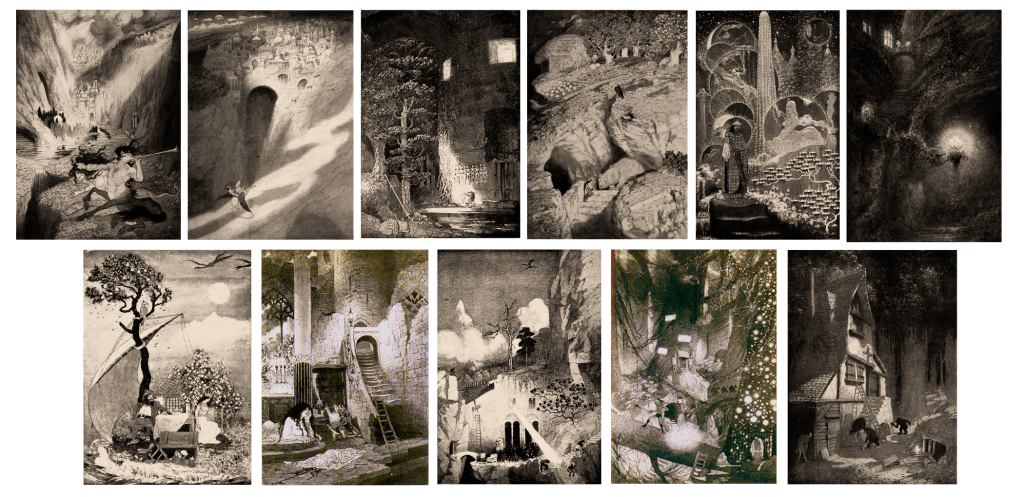
He had a wonderful imagination. Still, Sime’s images often look as though they were found through the act of drawing and painting, not fully locked down in advance. You can see it in a few recurring traits:
Dream logic in the compositions: odd appendages, improbable towers, and strange silhouettes that feel less like academic illustration and more like an artist noticing possibilities inside the developing image and following them.
Forms that seem to emerge out of texture and shadow rather than being mechanically planned from the start.
Architecture and figures that feel invented midstream, as if one shape suggested the next.
Selective detail, where one area becomes highly specific while other parts stay loose and suggestive, which is often a sign of discovery rather than rigid predesign.
Examples?
Yeah, I see the dreamy, moody thing you’re talking about. So what’s the travesty with this book?
In my mind, if Sime’s art came first and the stories were largely built from them, then this book is a composite work that should be inseparable. The art should be included in every reprint and copy. In fact, the images ought to come first before each story so the reader can follow the process for themself. You should be able to see the art cleanly, clearly, in good resolution, ideally in color, then proceed to the story to which it is attached.
But that’s just not the case.
I argue that in the far majority of cases where this incredibly influential and popular book is made available, it is without illustrations at all or is included with revised artwork. As if the Sime work was just some bumpkin’s outdated attempts at something a modern artist could exceed or modernize.
Worse, it’s a maddening trail of low-res scans and dead-ends to even find decent reproductions of Sime’s work at all! Even the dedicated Sime gallery in Surrey doesn’t contain the bulk of the images from The Book of Wonder. Dunsany’s castle supposedly houses the majority of Sime’s work that was meant for Dunsany’s writings, but you have to arrange a visit to see them!
That does seem annoying. And a shame. So what did you do about it?
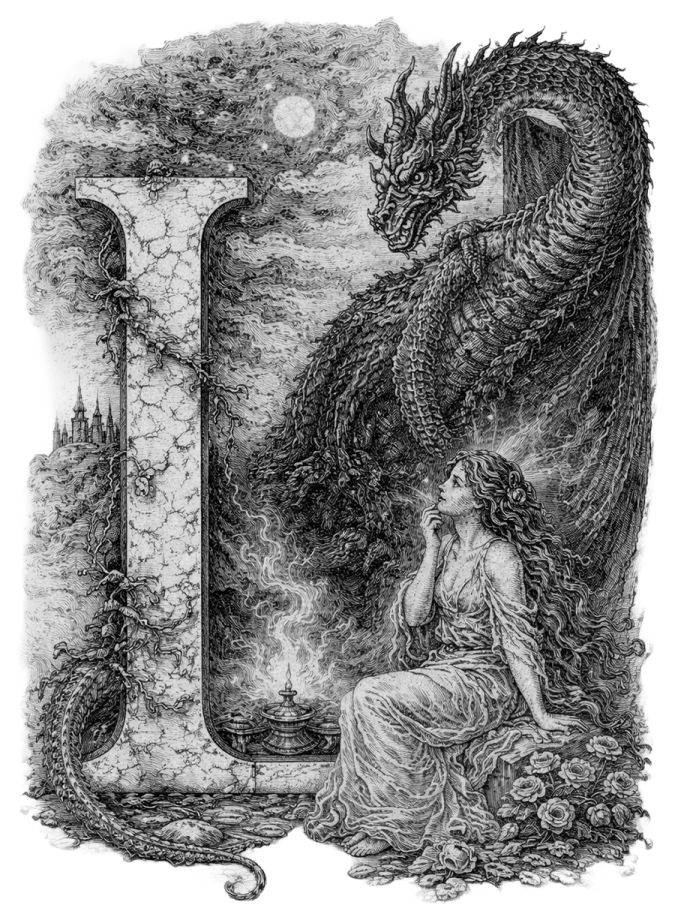
We produced a pdf version with a new front and back cover, collecting the best possible scans and most accurate text, and laid them all out in a beautiful spread with original “historiated intials” to begin each story.
Like this one:
Was it hard to find the art scans?
It was! Far harder than it should have been. We used the original 1912 version as the guiding light matching the images to the right stories. Everything needed cleanup in Photoshop. In one case, there was a lost artwork that didn’t actually appear in the 1912 version but DID appear in the Dec 1910 issue of The Sketch Magazine. Thanks to Douglas Anderson, original investigation result linked here for tracking down the lost image which likely inspired The Injudicious Prayers of Pombo the Idolater.
My main point with this labor of love is that Sime deserves co-credit for this incredibly influential work of fantasy. It’s a travesty that it was this hard to find half-way decent scans of his artwork that needed this kind of editing to even be presentable. If there was enough time in the day, we would contact Dunsany Castle and try and influence them for better scans and a new memorial edition, maybe including some correspondence between them to liven up the work. That would be amazing.
What do you hope to accomplish with this, then?
Just inspiration. Like everything else we do here at Grailrunner, we wanted to bring you the story of this fateful collaboration and give you the chance, as best we can, to gaze at the art for yourself, dream up something original for them if you like, before stepping into the wonderful mists of what Dunsany did with them.
Let’s have that download link!
*
That’s what I wanted to bring you today. I hope you enjoy the compilation and restored art. If you DO go inside The Book of Wonder to spend time with these two miracle-workers, it will be time well spent.
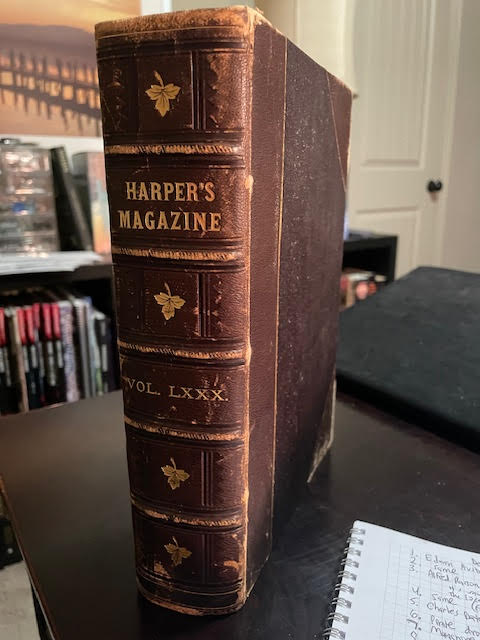
Last July, I told you about a hardback bound volume of Harper’s New Monthly Magazine from the 1890’s that I’d found in an old antique mall and which contained the most face-melting pen & ink illustration I’d ever seen. Check that out here. I’m still obsessing, of course, and that’s why I’m here again with another round of highlighted drawings from the golden age of illustration.
I thought I’d go back a bit, possibly to collect a good thirty year expanse, and showcase some of the more inspiring artwork and exquisite pen & ink craftsmanship. I’ve gotten my hands on Volume 80, covering Dec 1889 to May 1890. Welcome back, and I hope you enjoy perusing these master works as much as I did discovering them. Flipping these pages is an exploration I can’t get enough of!
Shall we head inside?
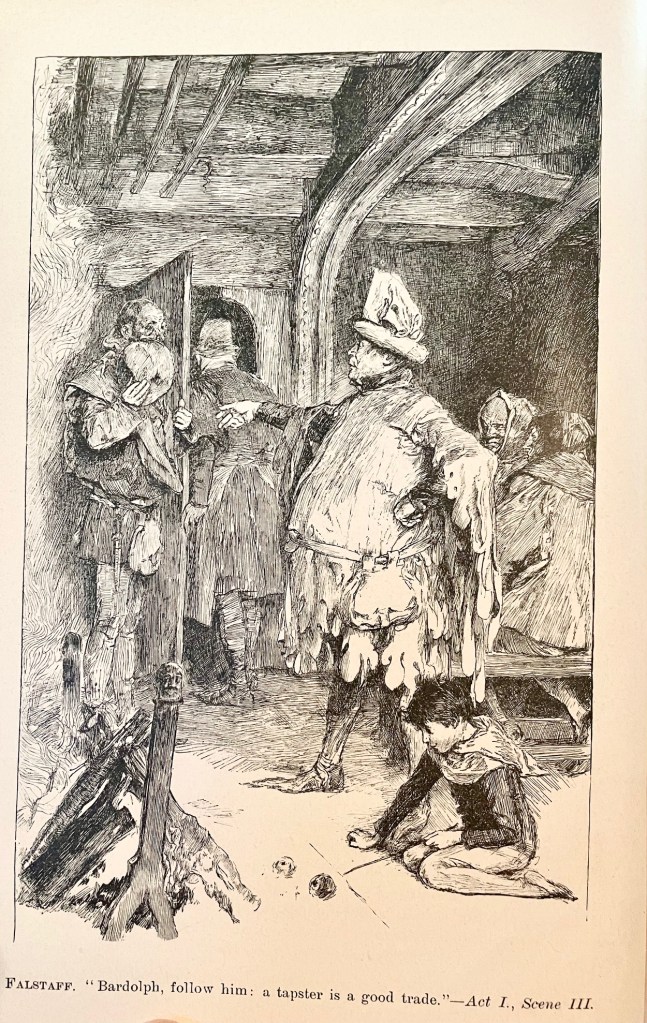
Here are two by Edwin Austin Abbey, best known for his Shakespearean and Victorian images, illustrating scenes from The Merry Wives of Windsor. Hands and fabric folds drive me crazy, and Abbey makes it look effortless.
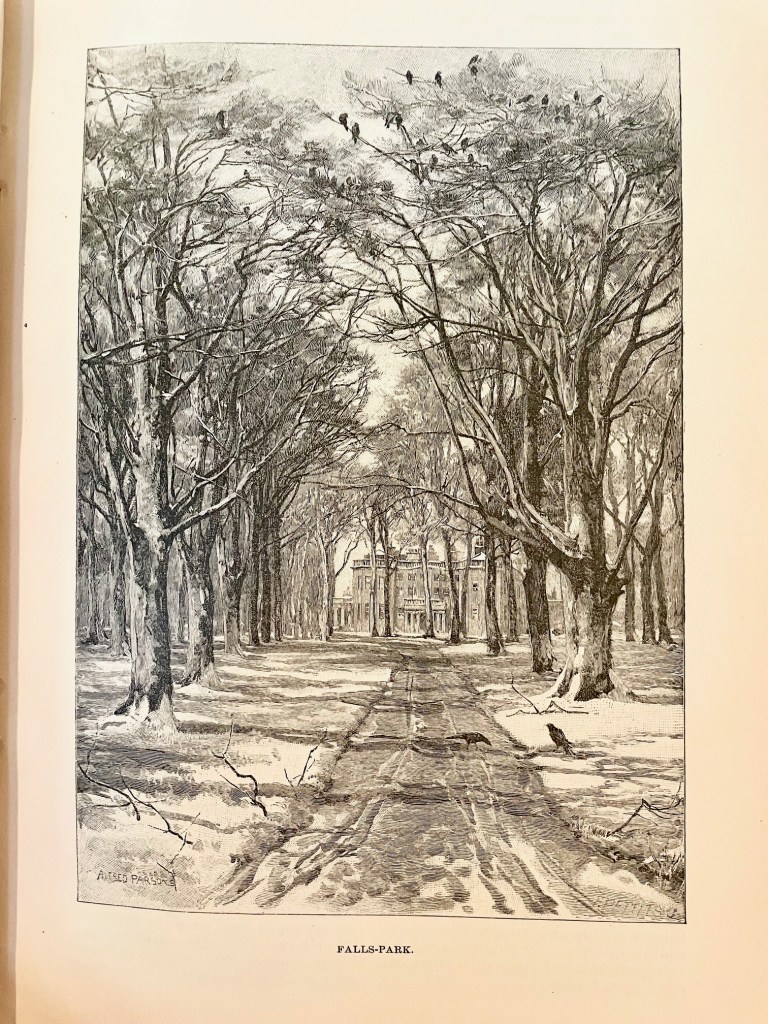
Here are two by Alfred Parsons, who was an illustrator, landscape painter, and garden designer. I found a citation suggesting that the author of the article (Thomas Hardy) took Parsons to the location so he could depict it accurately. You’ll find engraver signatures in the lower right-hand corner of some of these, as in the majestic estate scene on the right, but the original artwork was Parsons all the way.
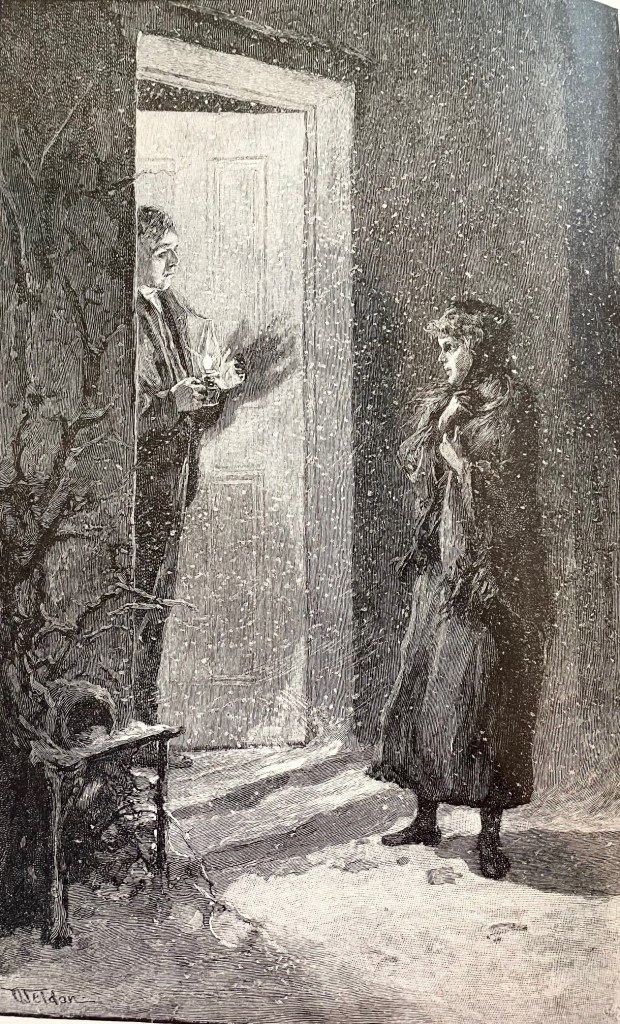
This masterpiece was by Charles Dater Weldon, and it’s the first I’ve come across anything by him (that I remember). He seems to have struggled for the kind of attention some of his peers found at Harper’s, but this drawing is a master class in leaving white space for effect. Zoom in and check out how he depicted the snow!
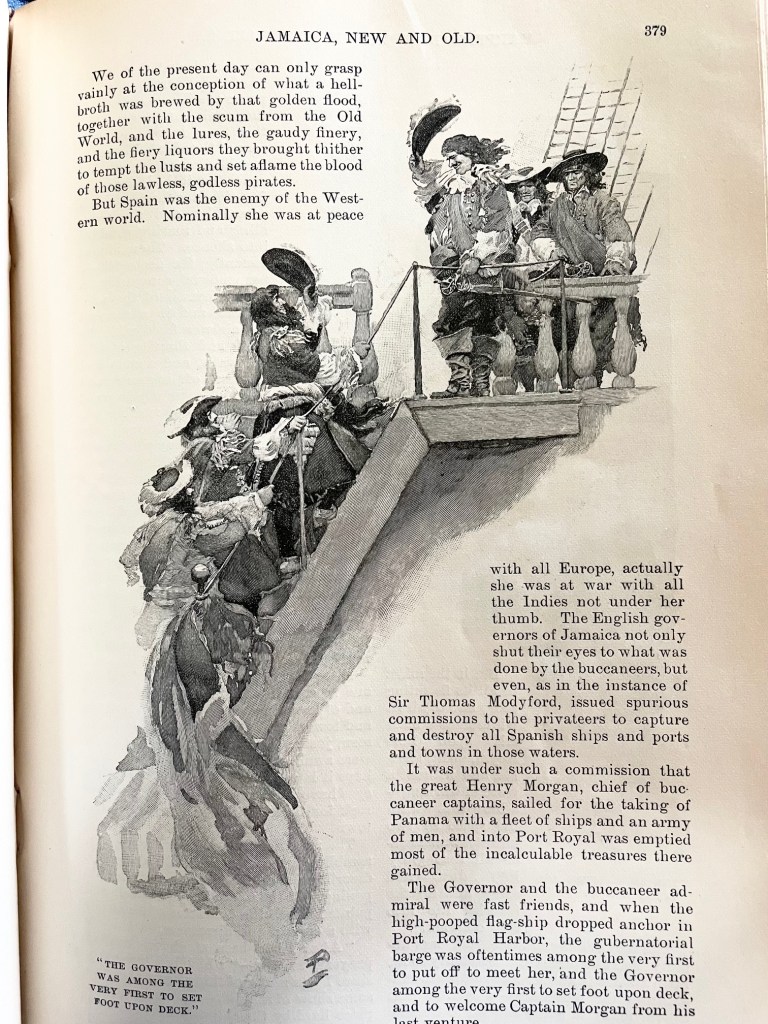
And now we come to Howard Pyle, and he was a genius. A groundbreaking genius. Not only are his drawings tiny little masterpieces all their own, but he cultivated the entire experience on the page. He would sometimes write, illustrate, and design the layout all in an integrated fashion to drive the effect he wanted. Pay special attention to how he forms the text around the drawings. The pirate drop-cap is especially fascinating – apparently these are called ‘historiated initials’.
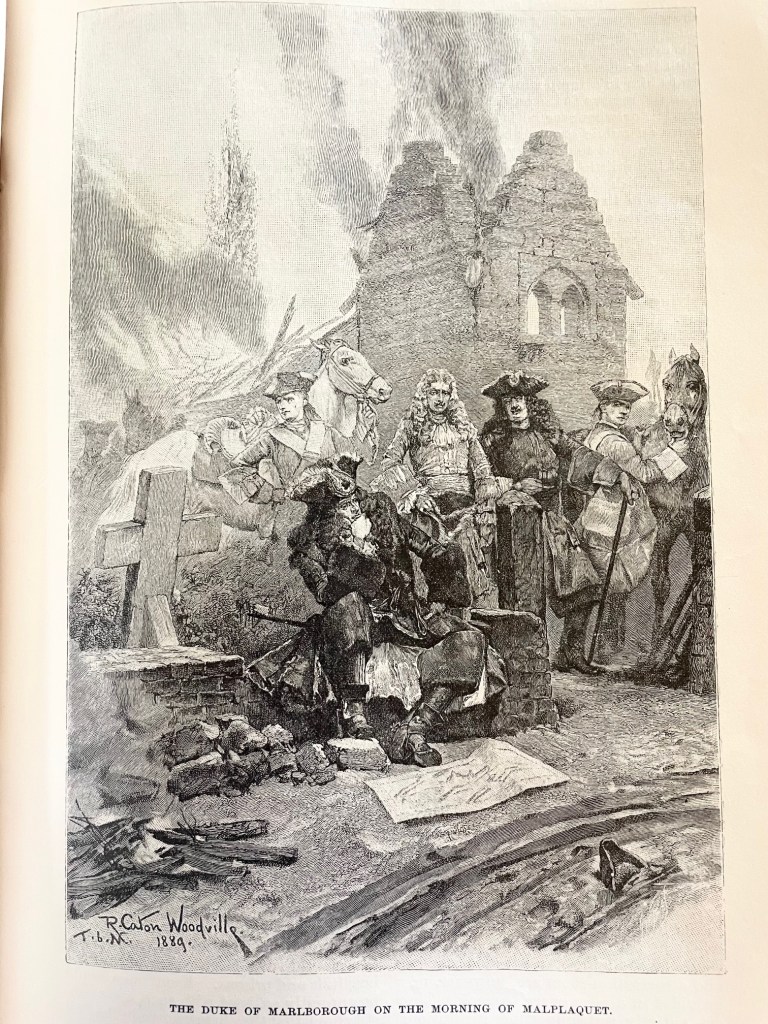
These next four were by Richard Caton Woodville, an artist renowned for his depictions of battle and military scenes. That last one is especially impressive for its perspective and scope, the strategic hatching and shading to draw your attention to the central figure, and – I don’t know why – but for the shadows and texture on the map lying on the ground. I really love it!
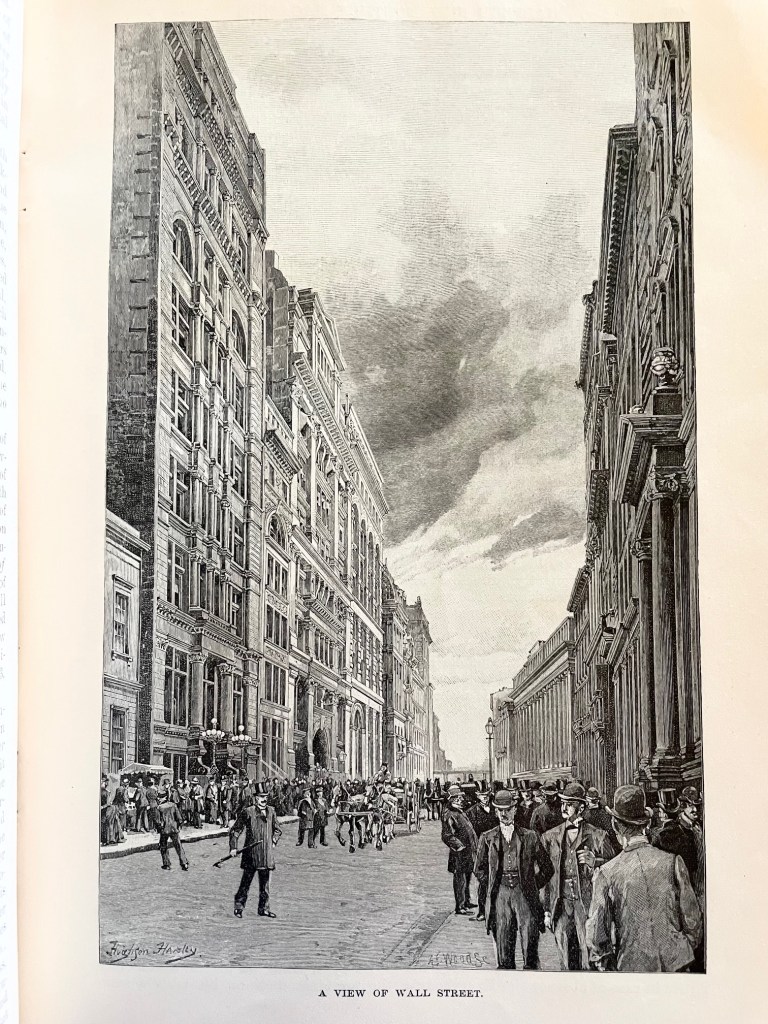
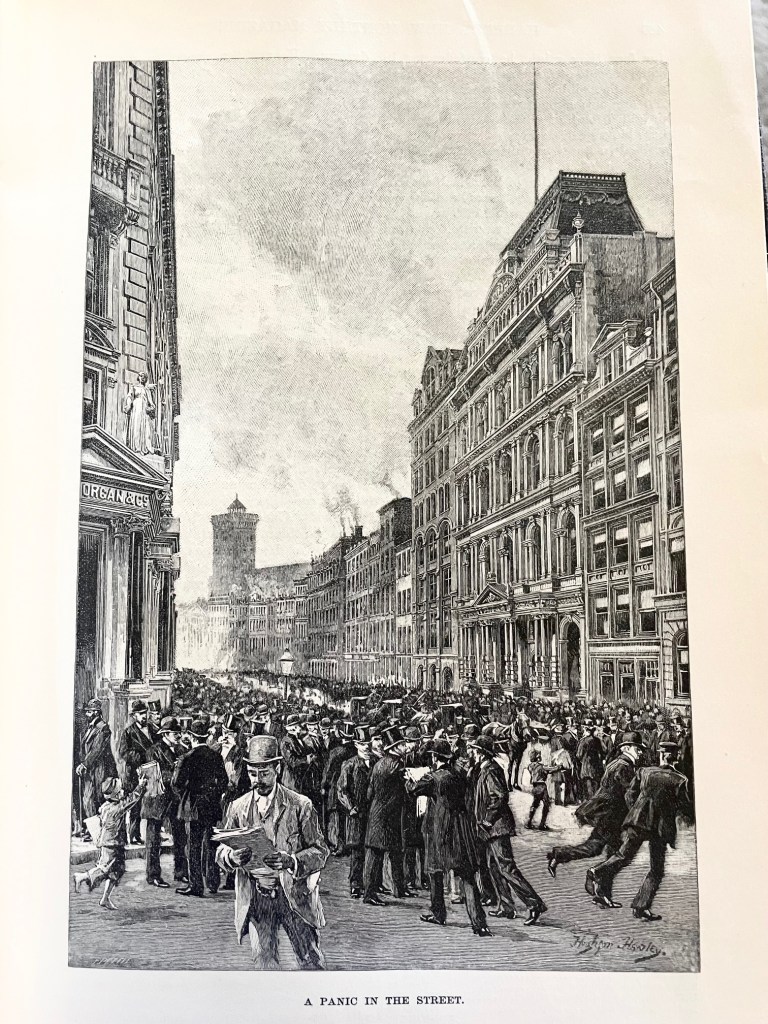
These two were by Hughson Hawley, who started his career as a scenery painter for Christmas pantomimes at Covent Garden in London. He was known for his architectural renderings. The illustrations accompanied an article about Wall Street, and their vertical orientation with exposed sky and building details make them really shine!
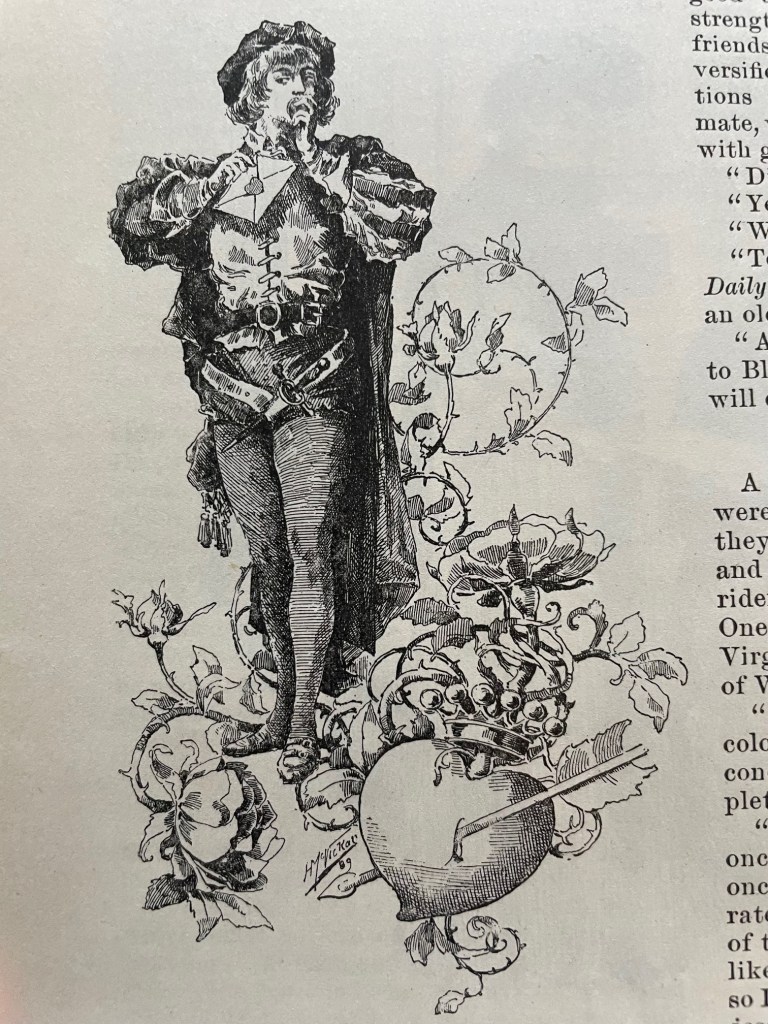
This is the only one I’m showing from Harry Whitney McVickar, an artist, illustrator, and real estate investor. He was also one of the founders of Vogue Magazine. This piece was just a flourish embellishing an article, but it stood out to me for its wonderful hatching and detail.
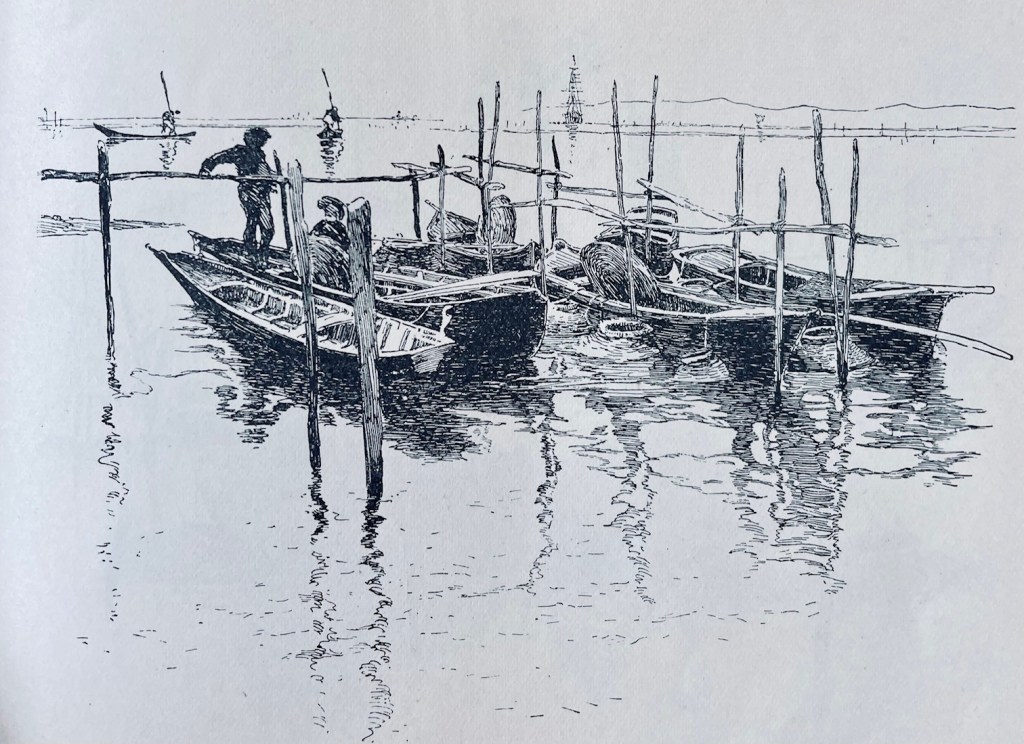
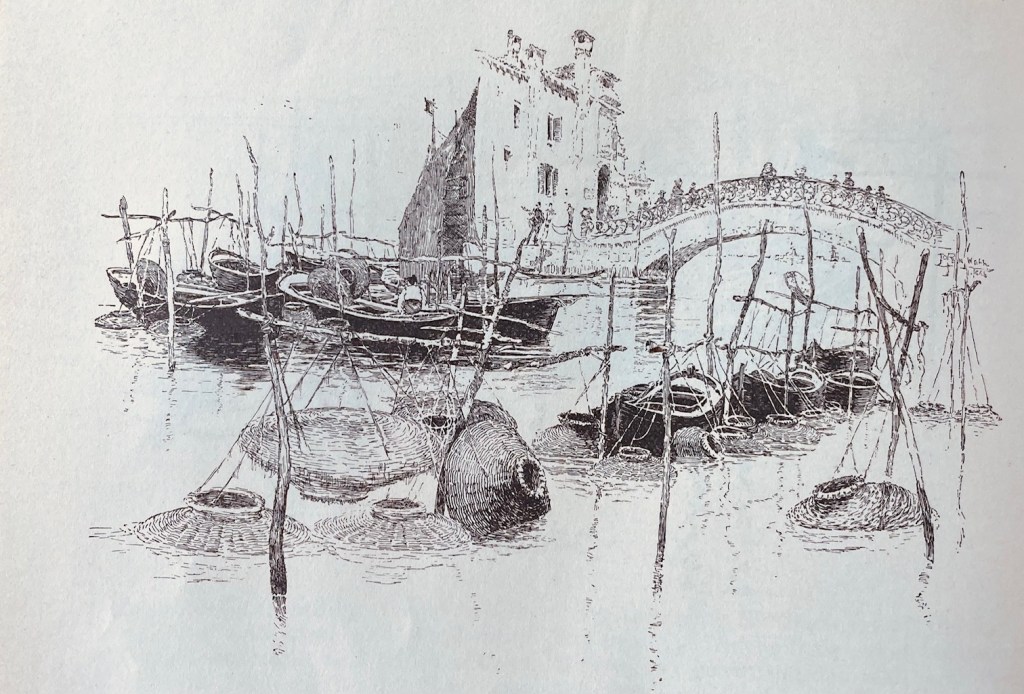
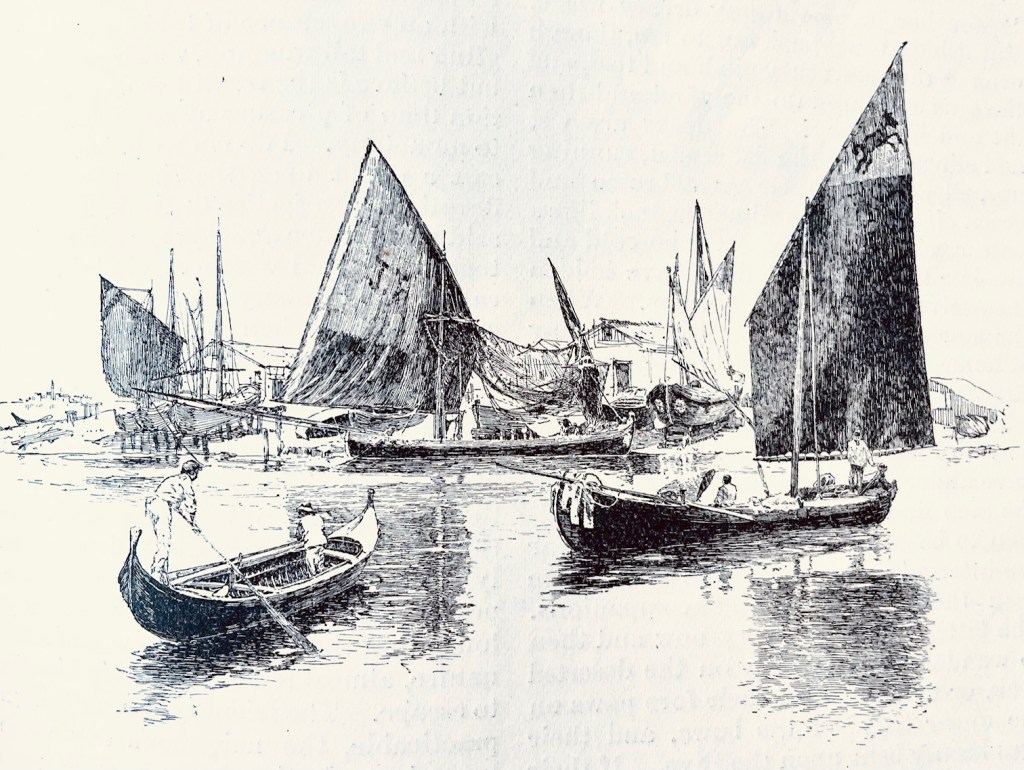
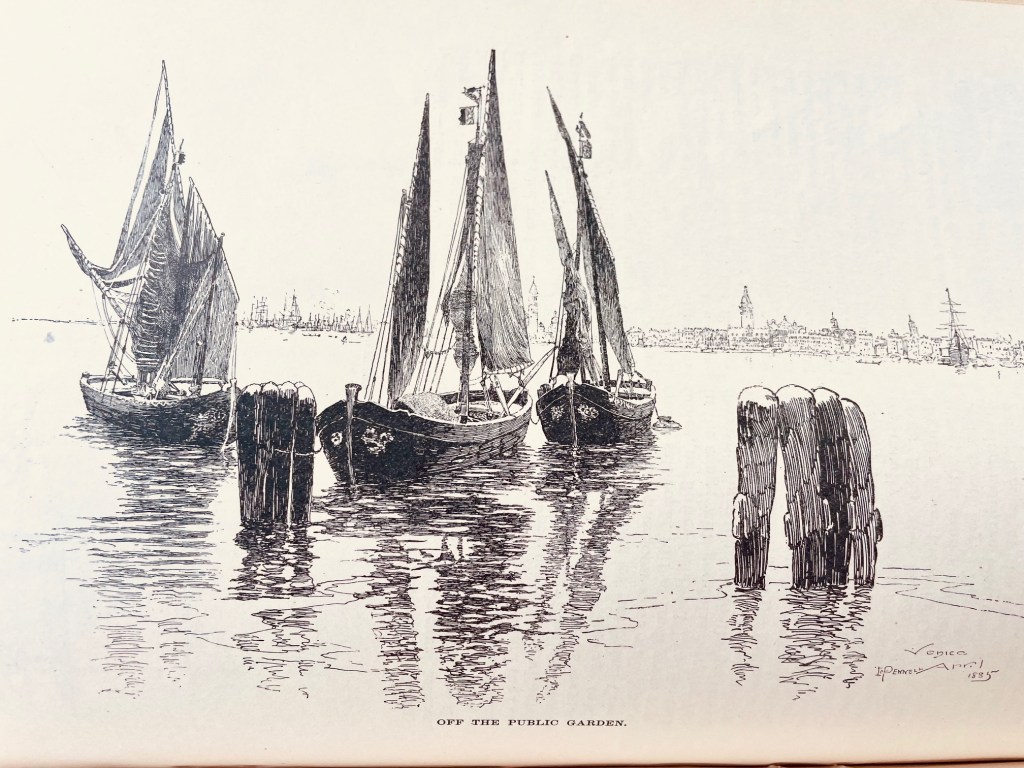
These next four are by Joseph Pennell, who was known for his on-location immediacy over polished artwork. Imagine him hurriedly dashing these off in open air at the scene he’s illustrating! The water reflections alone make these worth studying, but the hatching on the sails is equally impressive.
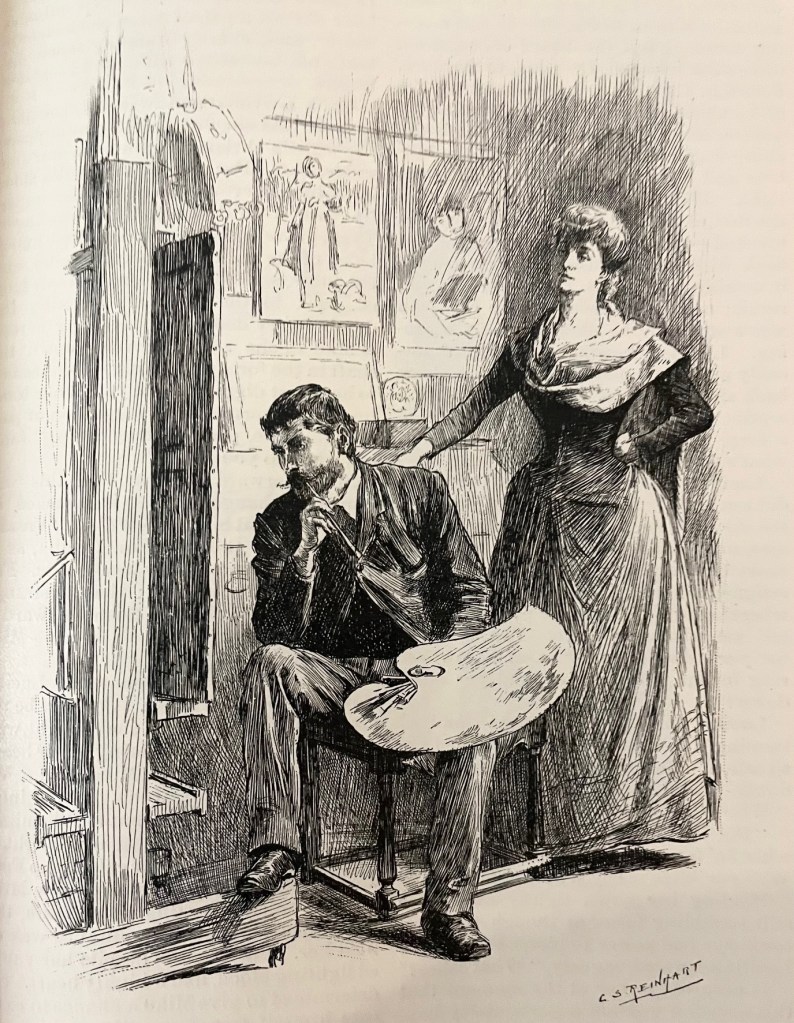
C. S. Reinhart was known for his character depictions, and that’s usually where Harper’s hired him. Here’s an especially well-done illustration of an artist in contemplation. Notice how he’s creating folds, shadows, and texture with his hatchwork. That’s super difficult!
Our last highlight is a stunning splash page by Luc-Olivier Merson, who became known for his postage stamp and currency illustrations. It’s one of the most astounding introductory pages for an article in the entire volume. The border and roof design are both gorgeous, and the florals jump off the page!
*
Anyway, I was worried when I ordered this volume off eBay that it wouldn’t recreate the experience of that first volume, stumbling in awe across forgotten masterpieces on every other page. But I wasn’t disappointed. It’s a shame so many of these craftsmen are forgotten today.
I hope you found something to impress and inspire. As always at Grailrunner, that’s why we’re here.
It started in October 2023. I used to fill sketchbooks with superheroes and sci-fi vehicles when I was a kid, but I hadn’t really touched it seriously in decades. Then I came across one of the marvelous Sketching From The Imagination books from 3DTotal, and it blew my mind! The idea of drafting my own concept art to summon up interesting ideas for the novels and games of Salt Mystic intrigued me.
But I sucked. And I’m hoping to keep that in the past tense, but we’re not there yet.
I wrote here before about some art advice I’ve picked up along the way, one of which crippled my drawing for a very long time. That post contains a couple of sketchbook updates to keep me honest and working to improve. It’s not super fun to share a journey because I would prefer anybody stopping by Grailrunner to check us out think that I’m a powerhouse of creativity and master craftsman of the imagination.
Still, maybe I’ll get better if I’m periodically embarrassing myself!
Then I took a road trip with my wife this past summer to the Mississippi Blues Trail and came across a hardbound compilation of 1890’s era Harper’s Magazines. I wrote that up in I Found a Pen & Ink Masterclass in an Old Antique Mall. Suddenly, traditional pen & ink became an obsession as I saw what Charles Dana Gibson and Franklin Booth and guys like that could do! My Booth research culminated in Franklin Booth: Engraver of Light and a trip out to see the Indiana house where he grew up and kept a studio. I also got the chance to interview a modern-day ink wonder-worker with Mateusz Lenart.
So what’s your process to learn and practice?
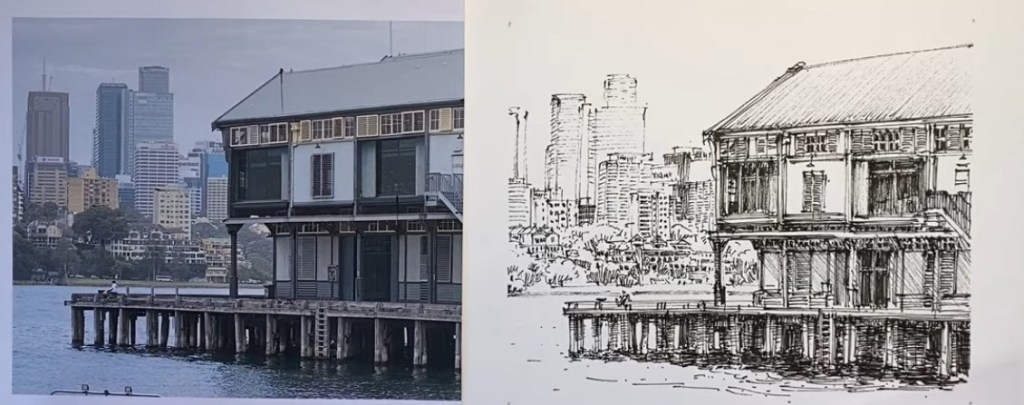
Two sketchbooks now. One is for drawing from imagination or freehand with cobbled-together references. That’s to work on my ability to reproduce things I’m looking at with tweaks and from different angles, and to experiment and be messier. For the other sketchbook, I generate a clean reference digitally with stock images, AI elements, or a combination of these, then trace the outline with a light table and work from the reference for rendering.
Any particular destination in mind here?
I’d like to combine the visual storytelling of Norman Rockwell, the ink style of Bernie Wrightson, and the sci-fi visual innovation of Juan Gimenez. That isn’t too much to ask, is it? Specific artists I’m looking at for their ink work are Charles Dana Gibson, Franklin Booth, Sergio Toppi, Bernie Wrightson, and Joseph Clement Coll.
Let’s do the countdown, shall we? Fifteen things I’ve learned in practicing traditional pen & ink and analyzing the masters:
#15 Using references is not cheating
I’ve got a love/hate relationship with using references because copying things wasn’t why I originally got onto this train, you know? Still, images in my head fade too quickly for me to look inward and draw what I see there. You do what you’ve gotta do, right? It’s been enlightening for me to see just how many professional artists use photographs and composite stock images for their references.
#14 Professionals work in layers
The masters lay down their structure, they build deep shadows, they add texture, and their pictures often look terrible in progress as it seems they’re destroying their own work. Then it somehow, magically, takes shape in the final product. The picture doesn’t have to spontaneously drop onto the page fully formed. It builds in layers. To be honest, I’m still struggling with this one, but I know there’s truth here.
#13 Strategic overlaps simulate depth
I couldn’t figure out why my grass, weeds, and trees in practice landscapes looked so awful and flat. It was driving me crazy. Then I took a photo of some plants growing by a lake near my house and made a strong effort to make the thick blades translucent and allow some shadow of a leaf behind it to be implied. That was a watercolor painting, but it got me thinking. Then a Stephen Travers tutorial on Youtube spelled it out for me that I was rushing my plants and tree limbs with flicks of the pen when a few strategically placed blades or limbs up front with detail, contrasted with flicks behind them and shadows below them would imply exactly enough to look FAR better.
#12 Texture matters more than hatching
I know this is true, but I can’t make my hands do it. Driving me nuts, honestly! But I’m abusing hatching and slapping lines everywhere to add shadows and it’s looking like washed-out, hairy messes at times. I see a guy like Alphonso Dunn teaching texture and realize what I’m doing wrong. You’ll see a couple of leaf studies in the accountability sketchbook below where I bottomed out on this. It’s something I’m keeping in mind as I work to improve, not something I’ve mastered.
#11 Simplify the reference and find the story
Photos capture everything. Reproducing them is compelling. It feels like practice. Then when I’m done, somehow the photo looks fine with all that detail and my drawing looks like a bowl of spaghetti fell on the paper. I’ve come to realize that “focal points” and “guiding lines” in a drawing really work, and that the viewers’ eyes really can be steered. Practically every professional artist seems to be saying the same thing on this – start with what story you want to tell, then draw only that. Just hint at everything else, and try not to even do that.
#10 Contrast is what pulls forward on the page, not line weight
I had been getting the impression from on-line inker tutorials and an Arthur Guptill book that dark shadows and heavy line weights look like they’re closer and lighter lines look farther away. In the sketchbook at the bottom of this post, you’ll see a drawing of a girl and a horse with a spilled water bucket where this came home for me. I needed the girl and horse to look closer, but there were dark shadows behind them in the stall, which crippled me. I mean, if I darken the shadows, the figures will be lighter and will look farther away when that’s the opposite of what I wanted! I realized with that one that contrast is what draws the eye, not darkness, so uniform shadow behind them is A-OK.
#9 Leave rest areas
This is a study I did of a Franklin Booth masterpiece. I usually feel a strange compulsion to fill the entire image with stuff. Can’t help it. Seems like the job. Then you see a composition like this where he leaves that wide open space for water, and you really get the importance of leaving something without details to keep things from getting busy.
#8 Shadows should be bold, should connect, and should be interesting
I first learned this from a watercolor artist named Matthew White. He kept going on about “connecting your shadows”, and “make them interesting”, and for a long while, I had no idea what he getting at. In my head, if the reference has deep shadows, then add them. If it doesn’t, then don’t. Then you realize at some point that you’re not trying to copy the reference and there are emotions at play here with values, shapes, and configurations. Just like a bass guitar anchors music and things sound thin and weaker without it, the deep shadows are an anchor for the image.
#7 Outlines are okay, but be smart about them
“Things in the real world don’t have outlines.” That was the art advice that threw me for decades. I couldn’t see how to draw something without putting a pencil or pen to paper at the edges. With pencil, it was easier to smudge and add gray areas, so not quite as bad. But when you switch to pen & ink, every time the tip touches the paper, it’s crisp black. Walter Crane in Line & Form stated something in words that I was noticing with the ink masters – you can avoid outlines entirely by effective use of contrast.
However, outlines can also be fine with a smaller tip (like 0.005 liners) or if you break them up in the highlighted areas where the light is hitting.
#6 Think in clumps and masses for hair
Trying to draw hundreds of lines to simulate hair is crazy. It turns out that hair, much like foliage and grass, can be clustered into value patterns – basically grouped highlights and grouped shadow shapes. In the highlighted area of hair, a few well-placed strokes hints enough for the viewer’s brain to fill in the rest.
#5 Work in larger formats if you can
I think in 5 x 8 and 7 x 10 formats because sketchbooks often come like that, and it’s where I’m always putting my drawings. I have found, however, that many of the impossibly detailed drawings that catch my eye weren’t made in a pocket sketchbook. They were on much larger Bristol board or something like it. They were built large with room to breathe, and became sharp and complex when shrunk down in reproduction on the page or on a website. This comes to mind when I’m squinting at a drawing and switching to my finest liner to try and make something visually impressive at a small scale.
#4 Line hierarchy
As a kid or in school, I drew with just the one ballpoint pen and never considered needing different thicknesses. It wouldn’t have dawned on me to do so. Those early 20th century ink masters were using dip fountain pens which flexed to allow for varying thickness – but good luck keeping yourself in reasonably priced fountain pens and ink these days. Ahhh- but brush pens! Like the Pentel Sign Brush Pen that has that cool, stiff and tiny brush you can push on. And liner sets like Pigma and Uni, with multiple options to choose from. I have found that varying line thickness is visually appealing, and strategic use of bold lines for emphasis and lighter lines for highlights can help lead the viewer’s eyes.
#3 A good drawing can save bad rendering, but a bad drawing is hopeless
A weak composition or poor drawing absolutely cannot be saved by even superb hatching and shadows. It just looks like mud, and mistakes on faces or eyes or with the perspective are obvious no matter how awesome your rendering. I’ve seen that pencil drawings restrain me too much and make the drawings too clean, which I need to fix. But I’ve also seen how wobbly and searching my lines are when I don’t do a pencil drawing. I’m wondering if a very light, minimal pencil drawing that I use like a jazz score might be the compromise I need.
#2 Restraint looks better than over-working – the viewer needs less than you think
I over-work my drawings. Definitely. It happened even today, with me thinking this very thought. Every pass of hatching on the most recent drawing in the sketchbook, I thought to myself – easy…that’s probably enough. Then I kept hatching. I don’t know why. It’s crazy. Anyway, professional artists render much less than feels like they should. They hint where I draw. I’m especially bad with eyeballs; some of the professional works I’ve analyzed barely stroke the pen to suggest eyes where I’m drawing little ovals and working like crazy to make it look good. Nah…restraint is better than spelling everything out. Stop early.
#1 You can still fade distant objects with pen & ink
This one’s funny. I’ve tried a few landscapes where, like a dummy ignoring the lessons even in this post, I’ve meticulously tried to simulate everything in the distance and modified the hatching to experiment with every kind of value you can imagine. Then, I was watching Stephen Travers (below) draw a building on the shore with a city in the distance. I thought to myself as he got started – oh, man, is that detail going to look like a big, messy pizza when you’re done! But he used much thinner lines and wider spacing with fewer marks in the distance to avoid rendering everything equally and it looked amazing. The focus was right where he wanted it – on the building up close.
Okay, that’s a pretty good list. Let’s see that sketchbook then!
Let’s do it. Be kind.
*
And that’s what I wanted to bring you today. I hope it’s okay to share these lessons learned as I go, even though I’ve got so much room to improve.
Oh, wow, if you could have been with me at a rainy beach in New Hampshire in 2015! I had a half-day to myself, off from work with a rainy New England afternoon free. I drove from Portsmouth where I was working down to Hampton Beach. It was cold, gray, and everything was closed for the winter. There was one couple on the beach trying to make a romantic walk of it, but it was the slow, drizzling, mean kind of cold rain that soaks into your bones.
Most of the framework and plot of the novel I’d been writing for years had been rattling around in my head since my time in the Navy in the late 90’s. That’s a long time to cook the soup! I get that. And I’d been writing that book, my first one, for over 6.5 years. Almost 7. But I was close. All the threads I wanted to tie up were pretty much tied. I was planning to see if I could just park near the beach, prop open the laptop there in the car to the pat-pat of light rain, and see what I could do to carry things over the finish line.
There’s a statue of a lonesome woman staring at the sea there. I was down the beach some from her, facing the water same as she was. It was a great vibe, honestly. Not physically comfortable, but amazing for creative inspiration. And I did it! That last image…the last conversation…the final closeout I’d been looking for…it went onto the page all by itself. I couldn’t believe it! No one in the world to tell about it, and no one would probably even understand what a big deal that was for me, but it was truly done. Not rushed and not compromised.
Done, the way I wanted it.
What’s the big deal about that?
Writing a novel is challenging to every aspect of your life. Time spent writing is time away from your family. It’s time not working on your day job. And it’s hard – ridiculously hard! Stories grow more complex than you wanted, and characters change from what you made them to be. Dialogue that sounded awesome in your head repeats back as strained, alien, and as plot dumps when that wasn’t what you intended at all.
I was trying to earn my way, be a husband and a father, but still turn visions in my head into something real that could say something meaningful and outlast me: a world people could step inside. But I felt selfish every time I wasn’t playing a game with my wife or watching a movie with my daughter or taking my son fishing. Writing a novel is one of the hardest things I’ve ever done, but also one of the most life-altering. It changed me for the better.
Okay, so what are we talking about here?
It takes too long. That’s what I’m saying. Need to fix that. I’m over 4 years in to the novel I’m writing now. Not cool if I’m still banging away on it for three more years.
Talk to me, Grailrunner – how do we speed up the creative process?
If you’re a novelist, like the kind of folks who might read Grailrunner and nod, you feel the tug of two opposing forces:
You want your story clean, logical, tight, like a well-made blade
You write in spirals, rewrites, loops, hollows — messy, intuitive, iterative
Tell me I’m not alone in that. Anyway, it feels like a flaw to rewrite because it feels like starting over. I’m thinking in layers, but trying to polish before I’ve built the foundation.
But it struck me recently that concept artists have figured this out!
Many visual artists, particularly concept artists, work in ways that seem counter-intuitive. They don’t sit down with a crystalline vision of what they expect the final image to look like. Instead they check the brief and then:
Lay down marks, then react
Let accidental shapes guide the next decision
Build texture before form
Play off of unexpected accidents
Iterate forward, not backward
I wondered for myself then – this idea of a visual artist pressing ahead with abandon, careless of the final picture, knowing there will be revisions later but enjoying the process for itself and riffing off what they lay down – could that help me?
And?
Here are five principles I’m locking in for myself – maybe they’ll be helpful for you:
1. Generate the back cover text now
I built the entire cover for the book, including the artwork, but more importantly the back cover text. I printed it off in glorious color and even folded it into the size and shape of the final product so I could hold it in my hand. I needed that kind of focus on the story I’m telling (and why) to help me trim shiney bits and bobs that kept raining down from the sky. It’s a laser beam now. Anything not feeding that back cover promise is out!
2. Tell someone the one-line summary of what the book is about
My brother surprised me with the question when I was hip-deep in an action sequence and I hated my ill-prepared, off-the-cuff answer so much I called him two days later with a sharper and better one. Now, it’s like a mantra in my head helping me stick to that promise too. Like the back cover exercise, but even tighter!
3. Get to know the characters better before forcing them into a pre-defined plot
I spent some quality time just extrapolating for myself on what the main folks care about, what they’ve been up to when they’re not “on screen”, and some great backstory that might never make it to the page. AI tools like ChatGPT can accept your work-in-progress manuscript and engage with you in full conversations in those character voices. Crazy way to create a work of art, but an interesting way to immerse yourself in your own story!
4. Draft without editing – for real this time
I press ahead now on the chapter at hand. Just blast it out as intended, almost in a rush, to lay out the skeleton of what’s supposed to happen and let these people do what I know they would do. Tomorrow, I’ll go back over it again and catch the nonsense and the plot holes, the contradictions. Like the concept artist checking the brief, but then just laying down random marks according to what seems right, I’m applying that to the written page. The difference is the freedom now to avoid stopping constantly, in real-time, to worry over whether something makes sense right now and stop to fix it immediately.
5. Accept it when cool things need to die because they no longer fit
Oh, it’s hard! I liked Ilianore a lot, but you’ll never meet her. The climactic spearing from the sky – pretty sure that’s gone too. A midnight flight on a train – also gone. I’m trying, man. I’m trying to turn things loose now when they seemed so amazing but just don’t match up with where things are going or what these people would do. I’m considering short funerals for some, but for sure I’m pasting some of that old text into a document to save in a folder somewhere in case it ever needs to come back to life. Director’s cuts, sort of.
Anyway, that’s what I wanted to bring you today. These principles are speeding things along for me, at least. And I’m noticing a lot less hair growing on the plot these days. Less massive revisions are even necessary. Let’s hope that’s the process working its magic and not also my imagination.
Here at Grailrunner, we chase imagination as craft. Anything we can bring you that lights the fire of your creativity is fair game, with a special bend towards speculative fiction and fantasy. If you’ve got a willingness to tinker, you should find something here you can use, remix, or otherwise refine for whatever literary, roleplaying, or artistic wonders you’re cooking!
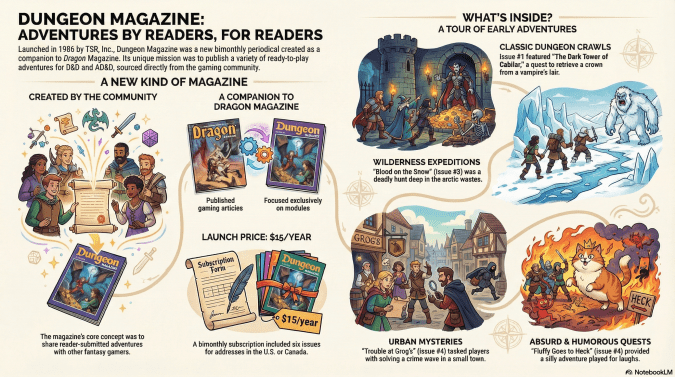
Today’s freebie is a really interesting one for the tabletop crowd, especially anyone who gets that nostalgic, electric feeling when you crack open old-school adventure content and your brain instantly starts building rooms, traps, villains, and bad decisions.
What’s the idea?
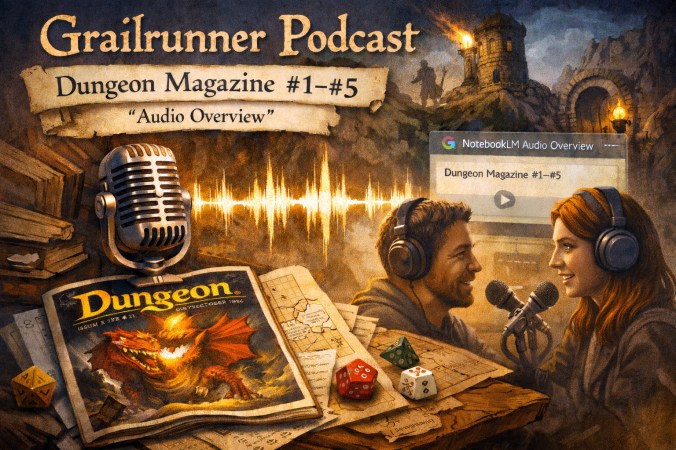
We wanted to turn classic modules from old Dungeon Magazine issues into a listen-able conversation
So, we generated a podcast-style episode using Google’s NotebookLM “Audio Overview” feature: one of those “wait…this is actually useful” tools that can transform your source material into an audio discussion format.
And the source material we fed it is a proper slice of RPG history (which you can download for free thanks to the folks at the Internet Archive – links below):
That’s the on-ramp period: Dungeon Magazine still finding its voice, still doing that early TSR-era thing where the tone can swing from earnest peril to delightfully oddball in the space of a page. It’s an incredible “creative compost pile” for modern GMs: hooks, maps, structures, pacing tricks, and that evergreen lesson that adventures are engines.
What is this (and what is it not)?
This is not a replacement for reading the magazines. It’s not “here are the adventures word-for-word.” Think of it as:
a guided audio tour of themes, adventure structures, and GM sparks
a way to re-encounter old material when you’re driving, cleaning, sketching, or prepping
a fast way to ask: What’s in here that I can steal, remix, and make new?
We like AI tools as levers: ways to turn raw source inspiration into momentum, while still being upfront that AI was used.
Why Dungeon #1–#5?
Because they’re early enough to feel like a time capsule, but polished enough to still be usable at the table. The first five issues show the magazine’s core promise: a buffet of adventures with different moods and play styles. Exactly the kind of variety that keeps a campaign from turning into one long corridor.
Also, if you’re the kind of creator who likes grabbing one great detail: an encounter concept, a villain posture, a dungeon rhythm, and letting it domino into a whole scenario, these issues are loaded with that stuff.
Why NotebookLM for this?
NotebookLM’s Audio Overview is basically a “make my sources talk back to me” button. Google describes it as turning documents and other materials into an “engaging discussion.” blog.google
And that’s the magic. The format doesn’t feel like a lecture. It feels like you’ve got two curious nerds in the room pulling interesting threads out of the stack. For RPG prep, that’s gold because prep is often just asking better questions about material you already have.
What’s the Grailrunner angle?
If you’ve read our recent posts, you know the theme: build year by year, make interesting things, share freebies, keep the creative engine running.
This podcast episode is exactly that energy and another little proof-of-concept that says:
What if “reading old RPG material” became listening to it think out loud and THAT sparked your next session?
Smash the Podcast Announcement image below to give it a listen for free:
I’d love to know what hits you:
Which issue had the best “I’m stealing that” moment?
Did the audio format surface anything you’d normally skim past?
What should we feed NotebookLM next: old Dragon editorials? a run of White Dwarf? classic sci-fi pulp?
We’ve got a lot cooking for 2026, and if the last year taught us anything, it’s that the best stuff often starts as a weird little experiment you almost didn’t try.
A “bunny trail”is defined as a digression or tangent in a conversation, writing, or research that strays from the main point, often hopping from one related but different topic to another, like a rabbit darting through fields; it can be a useful, curiosity-driven exploration or a time-wasting distraction.
I sometimes feel like that describes me a little too well.
Anyway, happy new year! Let’s kick 2026 off with a new bunny trail and some freebies! This one’s for card game enthusiasts, folks interested in gaming history, and I’m adding a twist for game masters of RPG’s that would like to add some authentic wild west gambling into their next campaign.
Cool?
Before the holidays, I read a biography of legendary lawman, Wyatt Earp titled Wyatt Earp: The Life Behind the Legend by Casey Tefertiller. Great read, by the way, but not my point today. I catch odd things in between the lines sometimes when I’m supposed to be paying attention to the main storyline, and one thing that snatched my attention early was Earp’s passion for a card game I’d never heard of called Faro. It sounded awesome; I was surprised it wasn’t more popular now. They used to call it “Bucking the tiger” because some card decks had tigers on their backs. And of course that only makes it more awesome.
How do you play?
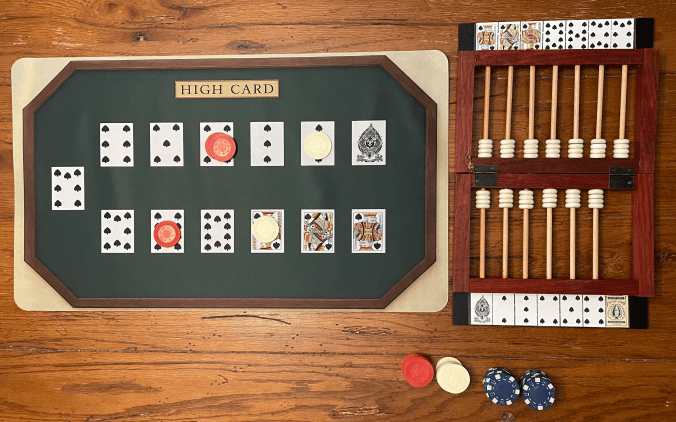
The main mechanic of the game is as follows:
One dealer, multiple players. Standard 52 card deck with no Jokers. Before them on the table is a spread of cards on which they’ll place their bets representing one each of a suit (so Ace is 1, then 2-10 and the face cards). The particular suit on the table doesn’t matter – just what kind of card it is. This layout is just a spot for players to put their chips as they bet on which cards the dealer will draw next each round.
The dealer draws one card at first to “burn the card”, which means nothing other than there needs to be only 3 cards in the final hand so this makes the numbers work. Nobody bets on that one.
After that, the dealer draws two cards at a time, the first being the “losing card” and the second “the winning card”. If you’ve got chips on a “losing card”, the dealer takes them. If you’ve got chips on a “winning card”, the dealer pays you out that many chips. The dealer doesn’t place any bets.
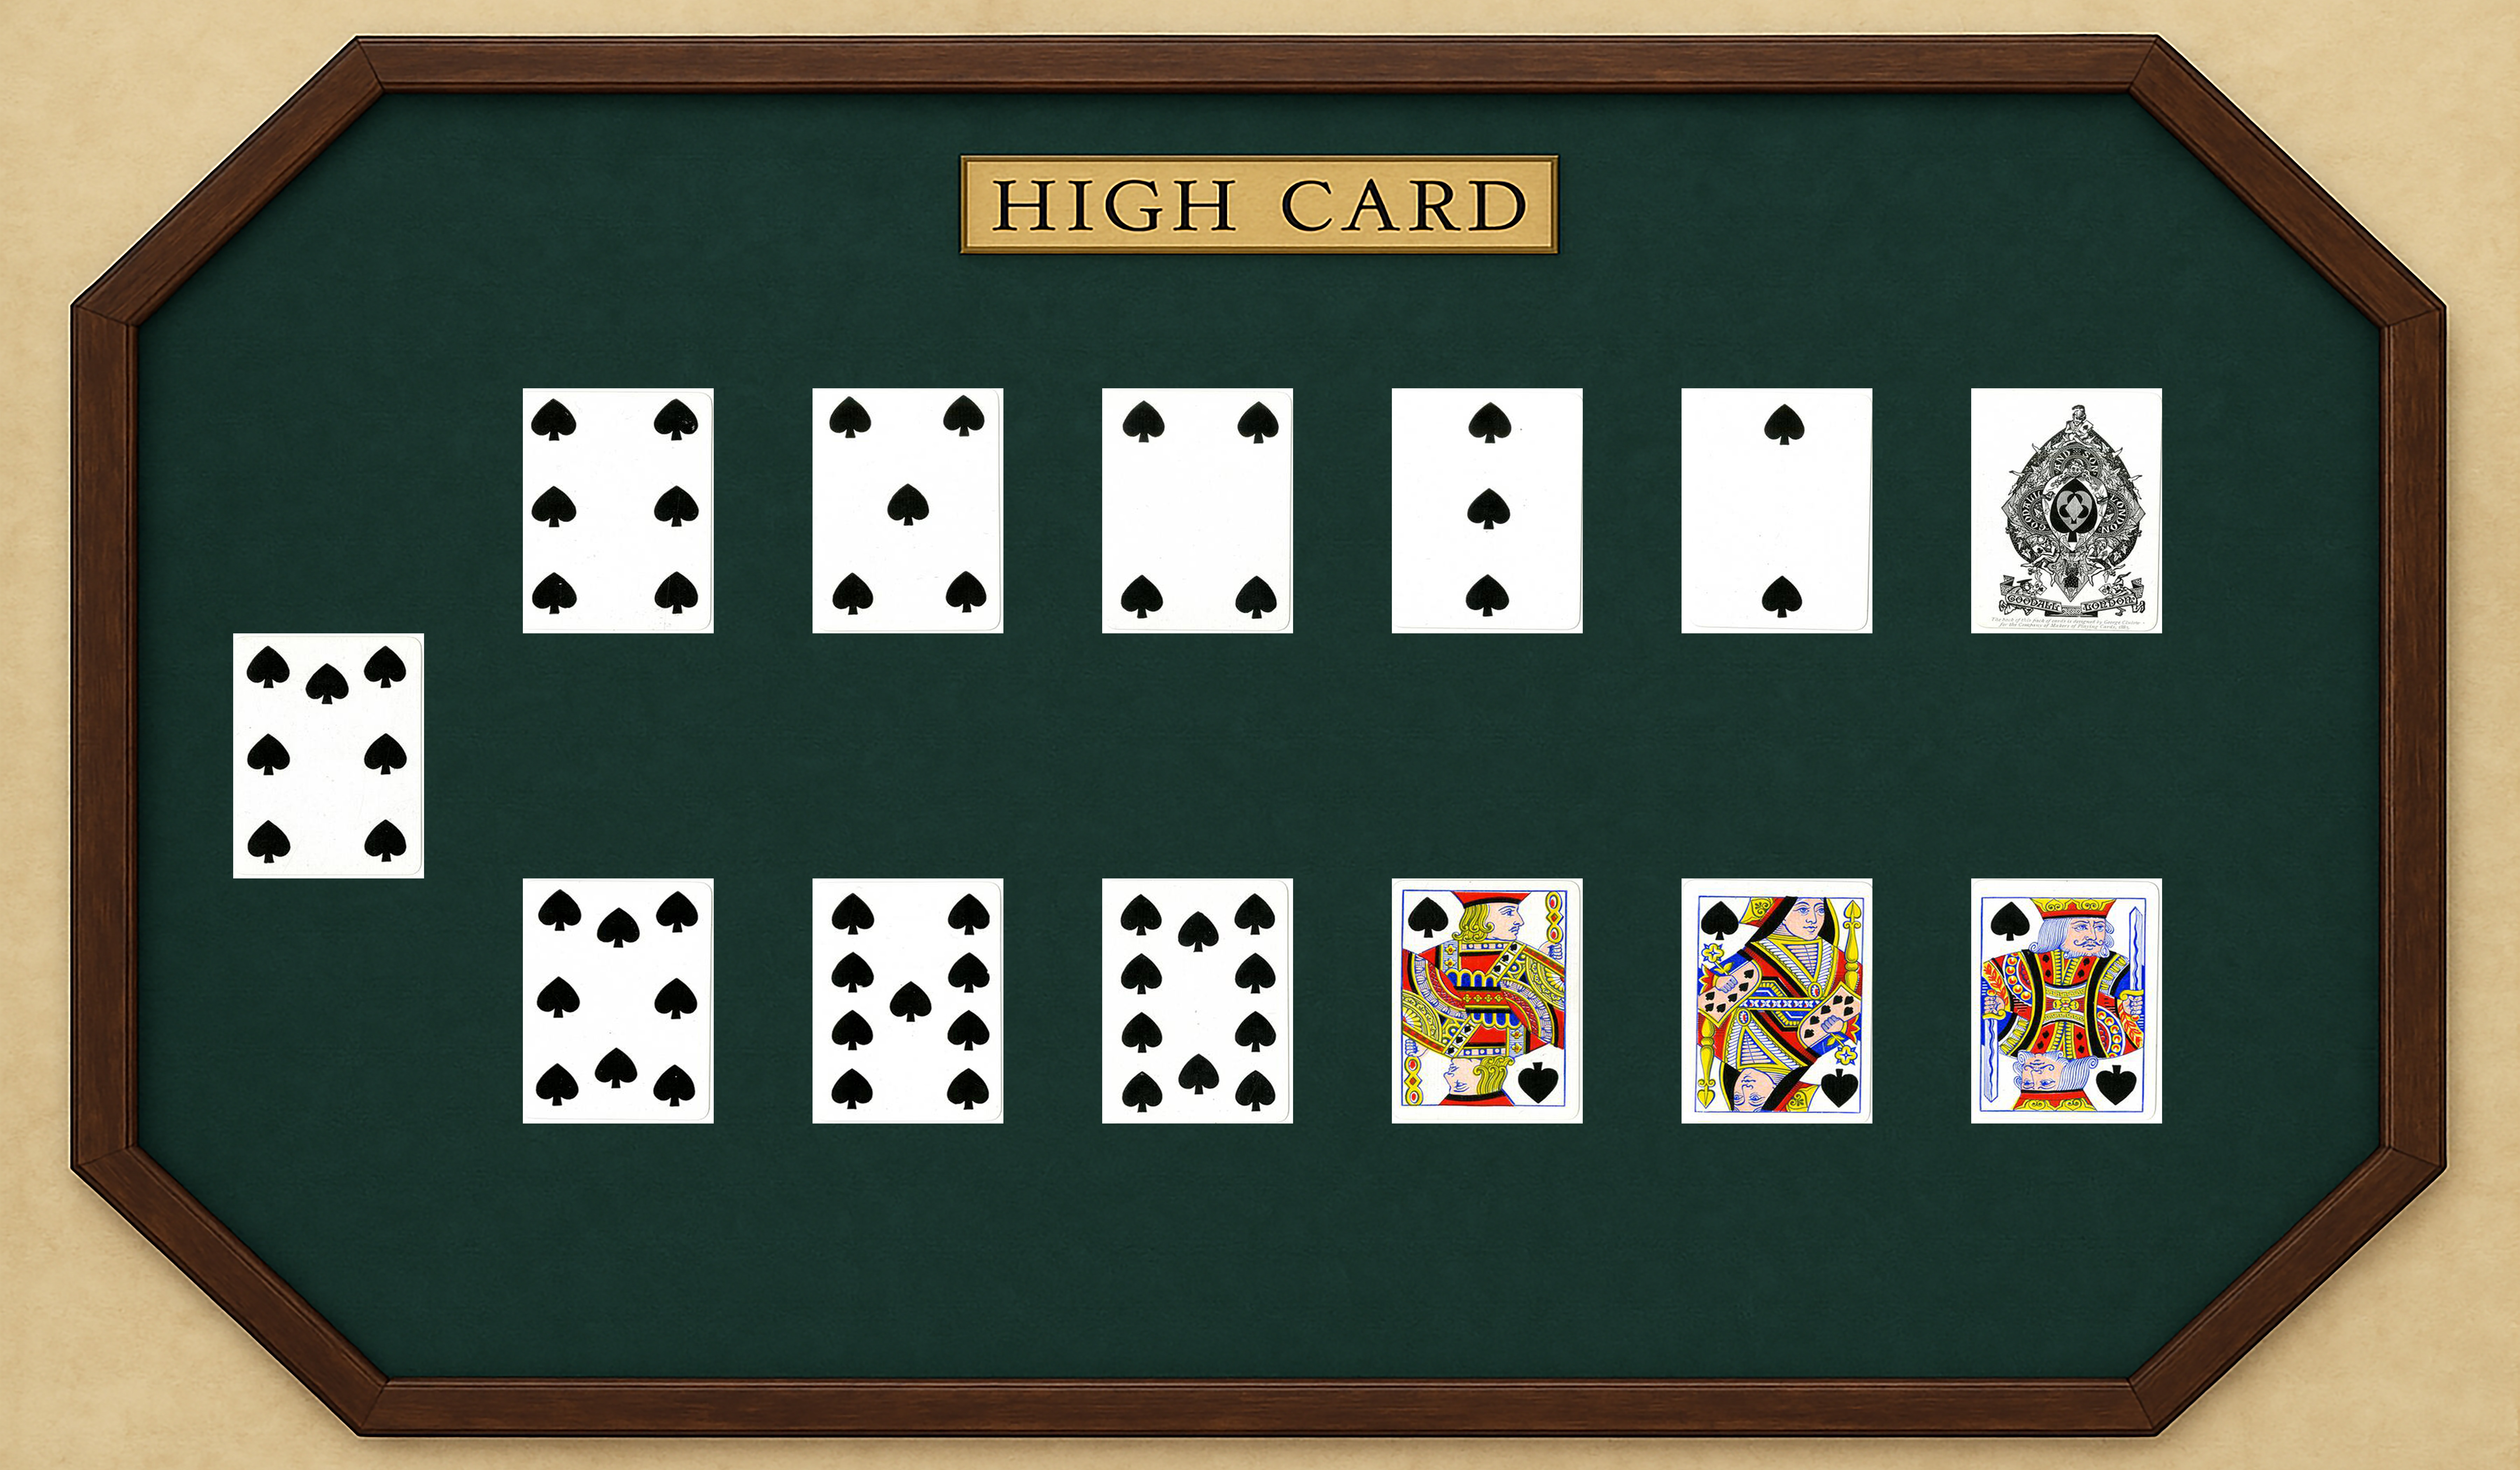
The plaque labeled “High Card” is a bet you can make that the second card will be numerically higher than the first card. Again, if you’re right, then the dealer pays you out however much you bet. Dealers can entice you to take advantage of that bet by upping the payout ratio (“High card’s paying out two to one next hand!”)
That abacus device was called a “case keeper”. You slide the beads to keep track of what cards have been drawn so players can know better what’s left in the deck to be drawn. It makes the game much more exciting towards the last few hands as you have better information.
The final hand of three cards is handled differently: players put a penny on the card they bet will be drawn first, then their chips on the card they’re betting will be drawn second (with the third and final card assumed).
Sounds fun. Why don’t people play this anymore?
It appears the house odds aren’t sufficiently in their favor to make this as profitable as poker or some other games. I’ve played it fairly many times now as dealer and can vouch for this – my family broke the bank more than once. Any ties where the dealer draws the same type of card twice go to the house, but that and the probabilities of the game just don’t pay enough, it seems.
And the cheating, which we’ll get to shortly.
So cowboys played this?
Oh yeah, big time! Anybody moving cattle to sell them in the bigger towns and with a little extra money in their pocket couldn’t wait to get as drunk as possible and play Faro. The house knew when to give out free drinks to shift the odds more in their favor, and when to send pretty ladies over as well for more distraction – offering rooms upstairs of course.
You mentioned cheating?
Oh, man was there cheating! Have a look at this book titled Faro Exposed: or The Gambler and His Prey by Alfred Trumble. It was published in 1882 and details the wildest machinations and sleights of hand that dealers would employ to make it all but impossible for players to win. And I heartily recommend this book if you’re at all interested in this game because it’s an incredible read.
The introduction of a mechanical means of dealing called a “dealing box” was supposed to give the gambler a sense that he was dealing with a fair game as it doled out cards one at a time through its apparatus. Supposedly, this took the sleight of hand and manipulations of the dealer out of play, but Trumble walks through multiple chapters worth of how that was also nonsense.
Here’s a funny quote from the book:
“But the reader will ask. Are there no honest gamblers? I answer no. Emphatically no. The sun shines not upon one honest gambler in all this broad land.”
Where did you get the stuff to play?
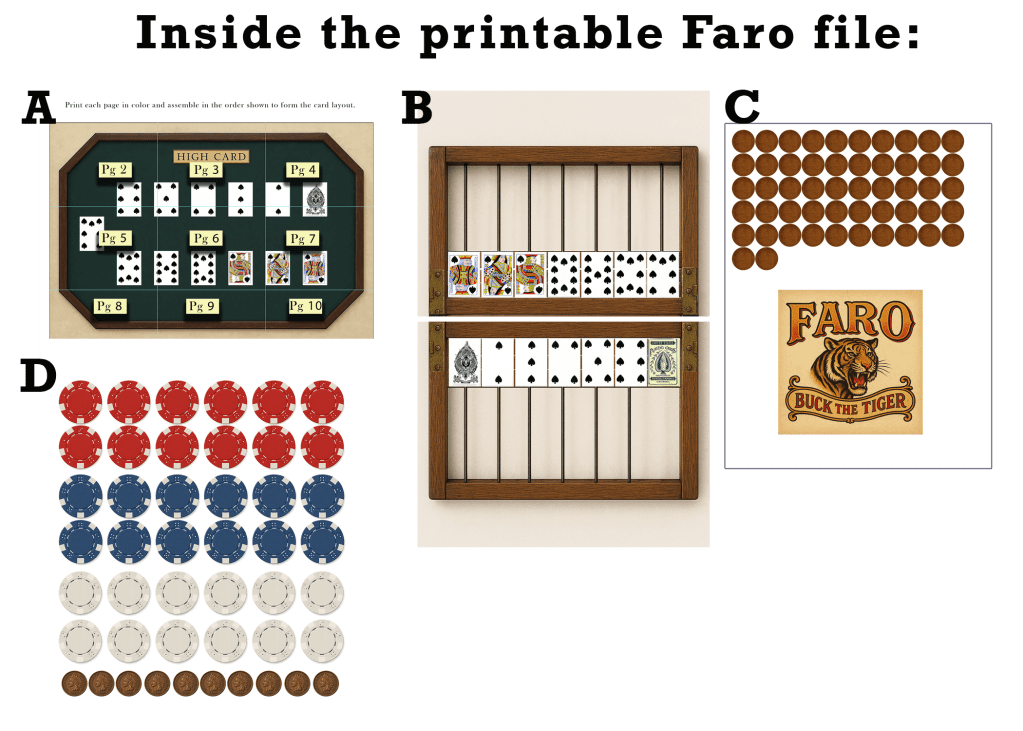
Here’s where today’s freebies come in! I made everything in Photoshop so it can be printed out on regular 8.5 x 11″ paper and assembled on the table. If you have a card deck, printer, scissors, and tape, you’re good to go. I included poker chips and pennies just for completeness but unless you have a Silhouette Cameo or a lot of patience, you’ll probably just use tokens or coins instead. That’s fine.
I wanted it to look cool and authentic though. The cards came from a Wiki Commons reproduction of 1880’s era cards. The coins too.
There are several pdf’s in the download:
A: The Faro card layout itself in several pages for accuracy on size – print and place per the instructions.
B: The Faro case keeper in 2 pages – just print and assemble per the picture. You’ll use pennies or tokens in place of the abacus beads and just slide them along the dowels in the image.
C: Some tokens to use (if you choose) on the Faro case keeper as well as the Tiger logo
D: Some poker chips and pennies (if you don’t have any handy yourself)
That looks great, thanks! Anything for roleplaying gamers?
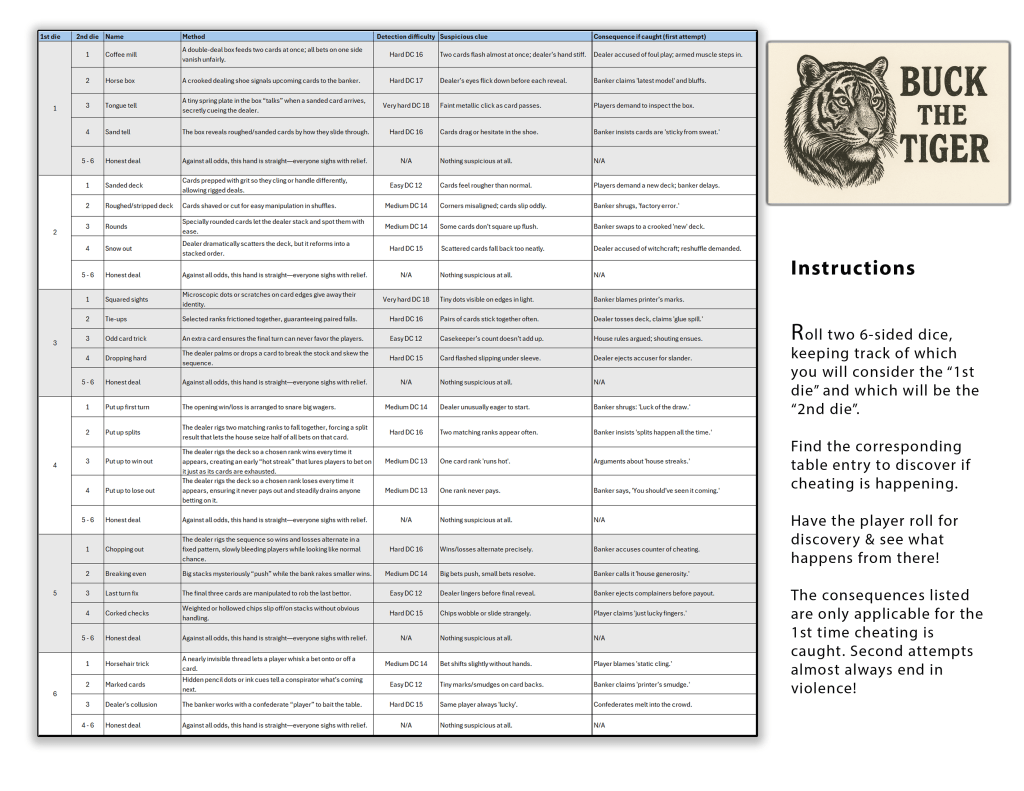
Trumble’s extensive descriptions of cheating methods made me wonder if this wouldn’t be a lot of fun in a roleplaying campaign – something quick to drop in to a wild west scenario in the ruleset or storyline of your choice where players could actually play the card game, gamble authentically, and be cheated. The game master could drop clues that cheating was happening, and dice rolls could decide how obvious that is and which authentic cheating methods were occurring.
Here’s what that wound up looking like:
Roll two D6’s to decide the situation from the table, then use Perception rolls (or whatever your ruleset uses for that) to decide whether it’s noticed or not. If it is noticed, then the table offers details on the clues to drop and also the consequences if the player decides to do something about it (first notice only – after that, guns come out!)
Here’s that table in a printable pdf as well if you think that sounds interesting:
If you’d like a high resolution 24″ x 14″ jpg of the Faro table to have a playmat printed (like I did), just click the image below for that. I used Frogigo (link here).
And that’s what I wanted to bring you today. I hope you’re as intrigued as I was – it really is a fun game, and the images of sly dealers and drunk gamblers, the ensuing gunplay, that all was just fuel for my imagination. We played this like crazy over Thanksgiving and Christmas. My dad especially loved it.
Best day of the year. No doubt at all. I love Christmas in all its crazy-train, circus-riot, flashing chili peppers. I’m sorry if it’s not your jam, and I completely get that for some people. But for me, it’s a warm, crackling fire and pumpkin pie, making the dog wear a goofy sweater, eating at Harvey’s in Kansas City at Union Station, snacking on exotic candy and cookies from World Market, and just enjoying family.
I hope yours has in store for you whatever warms your heart.
2025 was another fun building year for Grailrunner. We published our bibliomancy RPG Salt Mystic: Book of Lots in the Spring and submitted to the Ennie Awards. No dice on the Ennie’s (see what I did there, bibliomancy fans?) but a good experience nonetheless. Following that, we rebooted the Grailrunner store, including the Discovery Series of t-shirts and also started selling our first art prints there. Click the “Shop Now” button to check that out.
Upcoming, we’ve got two Grailrunner novels still in the works: Mazewater (set in the Salt Mystic universe) and a horror novel likely to be titled Line (set in what we hope to launch as a series of blues-saturated highway terror stories we’ll call Highway of Ashes).
We’re also refreshing the art on the Salt Mystic tabletop skirmish game. That’s particularly exciting because feedback has always been that people wish we hadn’t gone with the 3D art of the original. We’re fixing that, so be patient. So far, they look fantastic – there are just a lot of them and only so much time in the day (and budget).
I’m hoping in 2026 we can at least get started on a marvelous idea that’s been bubbling around the Grailrunner creation station for a few months now: a fantasy fishing roleplaying system to be called Dreamwater. If we can get this put together, and if you at all see the attraction of sitting by a beautiful lake with a fishing rod in hopes of catching a magical fish that speaks and possibly changes into a fighting beast, then we’ve got your back with this one. Will be amazing.
Anyway, thanks for hanging around with us this year and stopping by to see what nonsense we get up to. I’m always interested to see where people are that read our posts – drop us a note here or on the Facebook page to stay in touch. Let’s hope we can keep finding novelties of history to tell you about, fascinating creators to interview, great pulp science fiction of the past to highlight, and amazing freebies to send your way. Have a look here to see if you missed anything cool.
Anyway, in celebration of the year and this holiday season, I wanted to point you to some beautiful and nostalgic Christmas illustrations to enjoy.
To honor Christmases of the past, I came across a few vintage Christmas illustrations and links to their sources that sent my mind reeling. I love the windey-turney path by which we got so many of our Christmas traditions, and these really caught my eye:
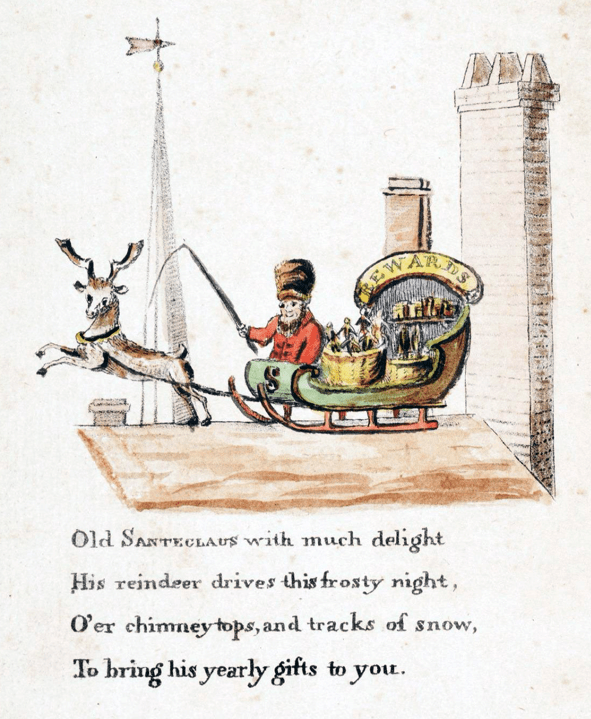
In 1821, a small illustrated paperback titled The Children’s Friend: A New-Year’s Present, to the Little Ones from Five to Twelve was published. It contained quite possibly the first mention and illustration of Santa’s reindeer and sleigh and predated Twas The Night Before Christmas by 2 years. It may have even inspired Clement Clarke Moore to write that poem, which of course gave us the core of our modern Santa Claus.
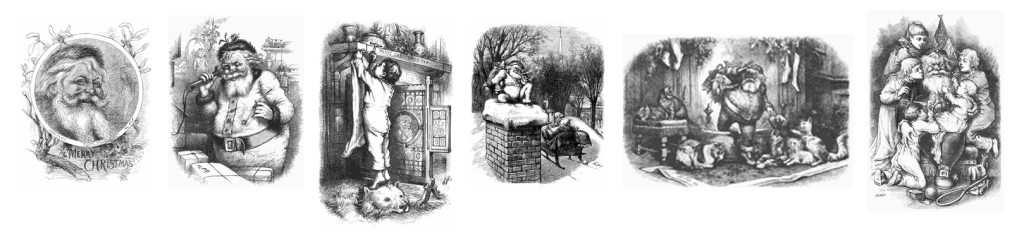
And of course the famous cartoonist, Thomas Nast fine-tuned the Santa we know and love today in his wonderful illustrations, many of which are compiled in a book titled Christmas Drawings for the Human Race. Here’s a link so you can take a look at the entire book. It’s a real treat to see some of these masterworks and know as you appreciate the craftmanship and warmth that these very pictures are what taught us how the jolly old elf looks and makes his way. In many ways, Nast described all this for us, and he did it to help heal America from its wounds from the Civil War.
Here are a few of those gorgeous illustrations, which are hilarious and charming. You really should take a few minutes to go see the full series of art pieces. They’re important history, but also just magical.
That’s what I wanted to bring you today. I wish for you all the joy that you can wish this Christmas and for a shining, prosperous new year.
For years we’ve been talking here at Grailrunner about how imagination works — why certain images crack open your brain, why odd bits of history or art or game design suddenly ignite a whole setting, and why creators keep coming back to the well even when the world’s noisy. We’re always on the lookout for new ways to break into exciting and innovative designs, imagery, and above everything ruling it all…to tell new stories.
OK, so what’s the freebie?
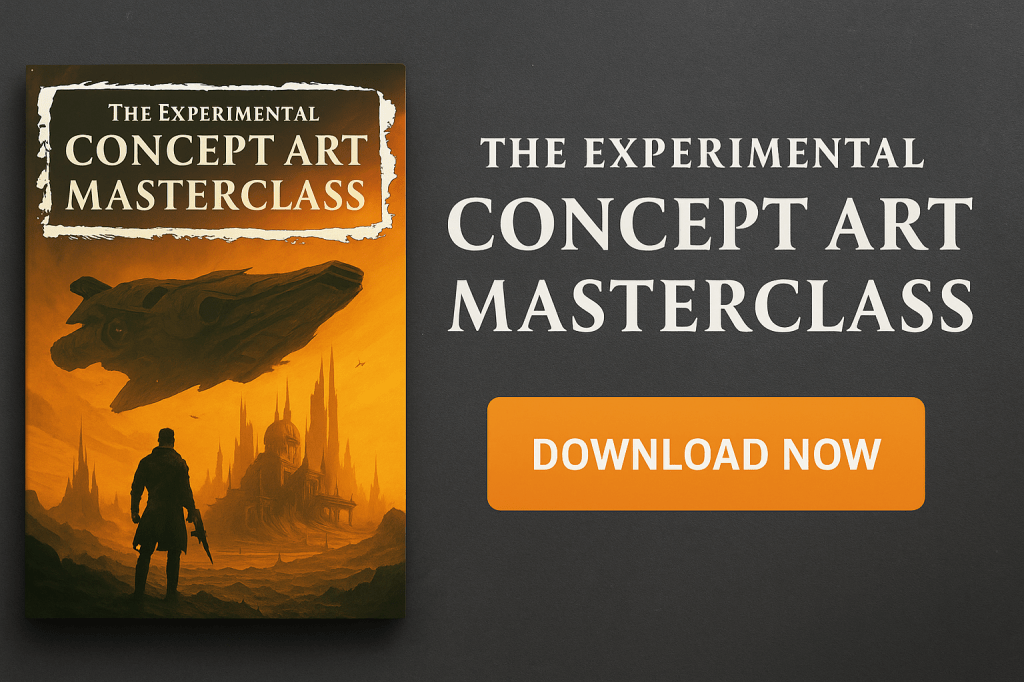
Hold on – a little context first. It was a life-changing experience for me personally to write and design our most recent publication, SALT MYSTIC: BOOK OF LOTS, a western-themed science fantasy roleplaying game book built around the fortune-telling mechanic of bibliomancy. I’ll tell you why. To build out the world of our signature IP at Grailrunner, I needed a ridiculously huge amount of outlandish concepts, crazy ideas, and just cool, new stuff! I kind of went down the deep well of concept art techniques like mind-mapping, thumbnail sketches and iteration, shape carving, scribble ideation, and mood boards. That stuff is like adrenalin for an imagination, honestly!
It was so impactful, in fact, that I wanted to go deeper. Yet it struck me that art school and super expensive concept art classes with some of the working masters in this field aren’t going to make sense for me. I imagine they don’t make sense either economically or logistically for a lot of folks like me. So it got me thinking I’d like a simpler, streamlined, but focused way of drilling deeper into JUST the parts of concept art that would help me – the techniques that help break your imagination’s walls to explore new ideas.
Sounds great. What did you do?
We don’t charge for AI-generated stuff at Grailrunner, and we always point out its use. In fact, we’ve built out some pretty amazing stuff that we give away just to experiment with possibilities and hopefully inspire anybody that hangs out here with us. If you keep coming back here, maybe you’ll buy a book or a game or drop a LIKE on our Facebook page. That’s the idea.
My absolute favorite giveaway so far has been an entire board game mockup set in the seas of Tolkien’s Middle Earth. Awesome. I just got a Silhouette Cameo 5 for my birthday, so I’m planning to break that puppy in with the printable tokens and cards there.
And specifically now for concept art techniques?
I curated a portfolio of concept art masters, provided an outline of content for my ideal coursework for a class, and instructed ChatGPT to act as the composite concept artist (meaning all those people) and write the chapters one by one for my outline as well as a preface and afterword. Then I went chapter by chapter and had it generate impactful exercises unique to each section which a student could conduct on their own with an internet connection and pencil and paper.
I mocked up illustrations of concept art techniques and examples to ensure the book is illustrated well and clear in what it’s saying. Then I bundled all of that into a professional textbook template and converted it into a pdf.
Inside you’ll find:
A step-by-step ideation → thumbnail → refinement pipeline
Practical exercises after every major section
Guidance on using digital tools without letting them boss your imagination around
A tone that assumes you’re already creative — we’re just lighting the boosters
That sounds nice. Your header says it’s “interactive” though. What’s that about?
I told you here that I’ve used AI tools to resurrect old masters and have them critique my own art to provide detailed feedback on what I could improve. That works surprisingly well, so I added instructions in the Preface on how to upload this very pdf to a student’s own instance of ChatGPT then have the AI act as the composite author critique their own uploaded exercises.
I mean. That’s totally possible and crazy to think we can do that kind of thing for free now. Anyone upset about AI being used like this needs to…and I say this with love…recognize this kind of workflow is an unstoppable industrial revolution. Your competitors are doing it.
Give me a download link, man! You’re killing me.
Grab the masterclass, run through the first exercise tonight, and then show us what you made. We’re still building this creative network in public — the more people who are sketching, painting, kitbashing, and worldbuilding alongside us, the weirder and better things get.
Enjoy, and make sure to let us know what you think.